

GAMS IDE has been part of the GAMS distribution for more than 20 years. The software was originally written in Delphi, and is progressively getting more difficult to maintain: It is getting harder to find seasoned Delphi developers, and the toolchain support is falling behind what is available in other programming languages. Importantly, Delphi support is restricted to Windows, but we want to have a good GAMS development environment in place on all our supported platforms. For these reasons, we decided to start with a blank slate and started development of GAMS Studio in C++ in early 2019, using the cross platform QT framework. GAMS Studio has been the default GAMS development environment since GAMS release 31 and we plan to discontinue GAMS IDE in the near future.
In a recent survey we conducted among a random sample of our users, we learned that a significant proportion of Windows customers still use GAMS IDE and have not made the switch to GAMS Studio. There are a variety of reasons for this, such as lack of time to learn a new tool, or bugs present in earlier Studio versions. We have been busy ironing out those bugs, and addressing specific issues and feature requests from our users, so please give Studio a try soon (or have another look if you have tried earlier versions).
Below is a brief tour of the important features that make Studio a great environment for developing GAMS models.
Project handling
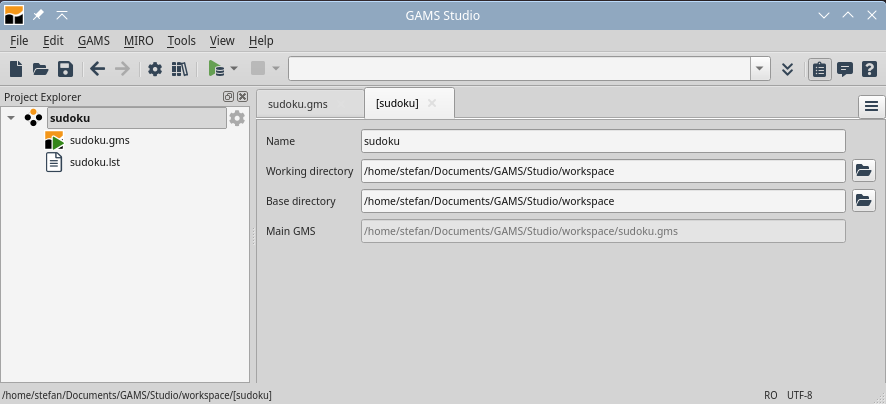
Projects are a way to keep track of the various input files, data files and output that belong together. When starting GAMS Studio for the first time, it starts with an empty Project Explorer . Opening a new file creates a new project per default. For each Studio project you can set a "base directory", which is the root of the project's directory structure shown in the project explorer. You can also set a "working directory", to tell GAMS where to place the files generated during model runs. The two directories can be identical, or you can choose to set them to different values.
In GAMS Studio one can move a file between projects by drag and drop in
the project explorer and add multiple .gms files to a project. In this
case the concept of the “main file” of projects becomes important:
While the classic GAMS IDE always executes the currently active .gms
file, GAMS Studio always executes the main file of the currently
active project. As an example, you can look at a.lst and press F9
to rerun a.gms (GAMS IDE would not run anything in this case).
After adding b.gms to project a, you can also execute
a.gms by pressing F9 while looking at b.gms in the editor.
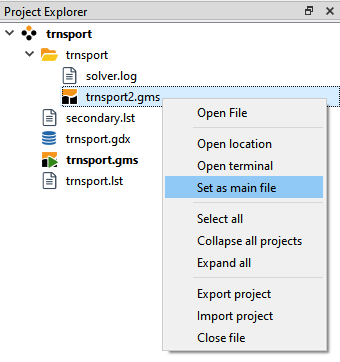
If you want to execute b.gms instead, you can make it the main
file of the project. For this, right-click in the project explorer on
b.gms and select “Set as main file”. Now the green arrow
indicating the main file of a project in the project explorer switches
from a.gms to b.gms and pressing F9 will execute b.gms in the
project working directory.
It should be noted that what is shown in the project explorer of GAMS Studio is only a view into the file system: If you remove a file from a project, it is not deleted from the filesystem. Also, if you drag a file from one project to another in the project explorer, the file is not actually moved into the project folder. Instead, the file stays at its original location within the file system.
Support of Engine, MIRO and NEOS server
Model deployment is becoming ever more important. To address this need, we have developed GAMS MIRO for generating graphical user interfaces for GAMS models, and GAMS Engine to support running GAMS models on centralized, powerful servers. Both of these new products make it easy to share models with distributed teams and to make use of compute resources in the cloud.
MIRO Support
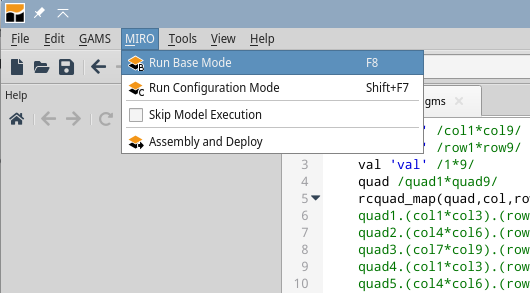
GAMS Studio fully supports GAMS MIRO development (if you do not know about MIRO yet, please have a look at our product page and the example gallery to learn more). Once you have annotated your GAMS model with MIRO language features, you can launch the MIRO configuration mode directly from Studio to configure the graphical user interface of your MIRO application. Once you are done, you can start the application, and also use the Assembly and Deploy feature to create a self contained MIRO application that you can share with others or deploy with MIRO server.
Engine Support
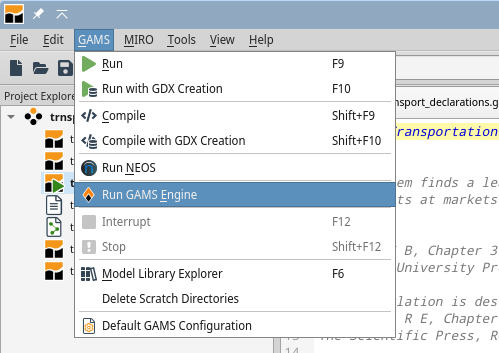
If you want to run your models on GAMS Engine , it is as simple as selecting the menu item, and then entering the URL, and your username and password for your Engine installation or for your Engine SaaS account. Studio will take care of uploading the model code to Engine, queuing it to be solved, and downloading the results when the job is finished. The whole process is totally transparent and feels the same as solving a model locally on your own computer, but with the benefit of having access to much more powerful compute resources. For our academic users, we also include the option to run your model on NEOS, which is a free service provided by the university of Wisconsin and provides access to a range of different commercial solvers. To learn more about this, have a look at this blog article .
GDX viewer
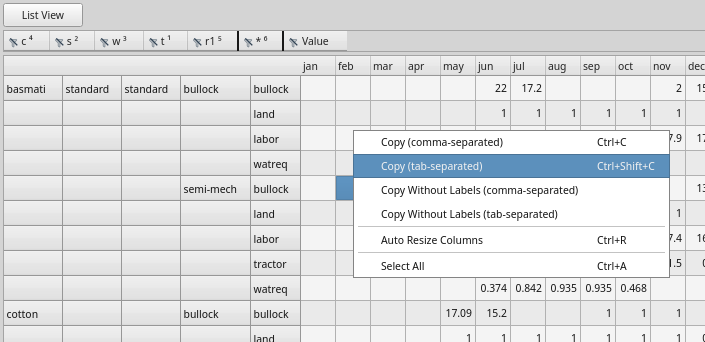
GDX files are the native GAMS data exchange format, which contain sets, variables, equations and all the other bits that make up the input or output of a GAMS model. With the Studio GDX Viewer you can get a quick overview of all these components in a list or in a tabular view. In the case of multi-dimensional data, you can rearrange the tabular view by simply dragging a column to another position. You can also filter and sort, and quickly copy data to Excel or other spreadsheet software by right clicking in the table, and copying data in comma- or tab-separated format. The GDX viewer is fast, which makes analysing bigger datasets a breeze.
In addition to the GDX viewer, there also is a GDX Diff utility , available from the project explorer (select two GDX files, right click and select “Open in GDX Diff”), or from the “Tools” menu. This tool allows you to comcpare the content of two GDX files, e.g. to compare the results of two model runs with different input data.
Reference file viewer
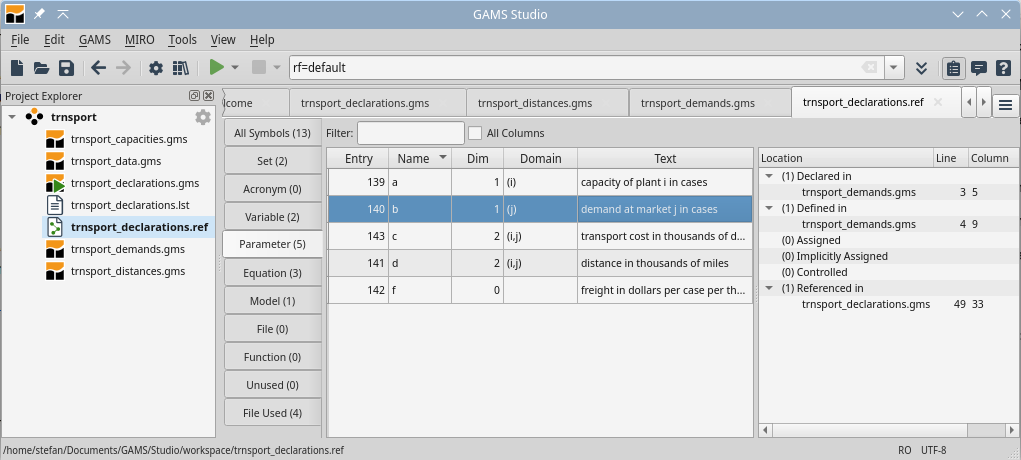
When your models grow in size and you start splitting things up into multiple files, it can become difficult to keep track of where certain elements are defined and referenced. GAMS Studio offers the reference file viewer to help you keep track of where things come from, and where they are used. With the reference file viewer you can drill down into all the sets, parameters, equations and more of your model and get exact line numbers where they are used. Clicking on a location then takes you directly to the correct place in your model code. You can find more information about the reference file viewer in the GAMS documentation .
Editor for default GAMS configuration
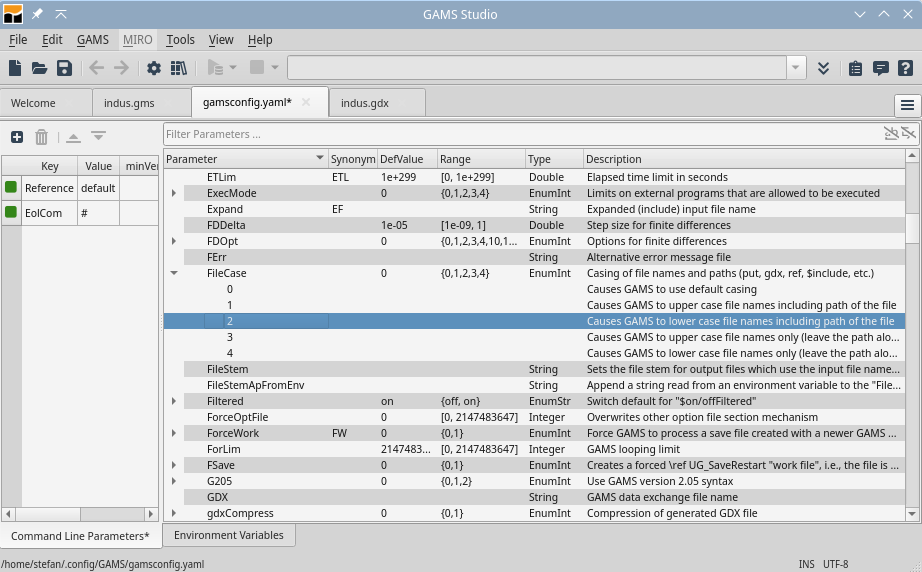
Default GAMS configuration options can be set in the file gamsconfig.yaml. This can be edited by hand, but Studio offers a much more convenient configuration editor, which allows you to set individual defaults and gives a brief explanation for each option and the available values for the different options.
Other Modern editor features
GAMS IDE is 20 years old, and you can definitely tell that when looking at all the modern editor features that you get with Studio, but not with the old IDE.
Distraction free mode. Gets rid of all widgets / windows but the main one. Great in combination with the full screen mode, especially on smaller screens.
Code completion, tooltips, help integration. Just start typing a GAMS keyword, and Studio will present you with a list of completions. Hover your mouse over a keyword, and Studio will show a small tooltip with a brief explanation of the keyword. If your model contains errors, the tooltip will help you get to the bottom of the problem. Press F1 on a keyword, and Studio will open the relevant section in the GAMS documentation.
Code folding. Collapse multi-line code sections such as $onText
comments, $onEmbeddedCode sections, if statements and more.
Selectable Text Encoding. You can write GAMS modes using your preferred encoding and include emojis if you wish. GAMS IDE only had support for ISO-8859-1, while Studio defaults to UTF-8.
Dark mode. For the night owls, you can switch Studio to dark mode, or even create your own custom editor themes.
There is also block editing, navigation history, bookmarks, help integration, duplicate editor tabs with synchronised scrolling ('pin view'), and much more.
Not available in GAMS Studio
At this stage, there are a few things not available in GAMS Studio, which have been available in the GAMS IDE. One of them is the text diff tool, which we plan to integrate at a later stage. Until then, you can use any of the excellent free or paid diff tools available, e.g. WinMerge on Windows, kdiff3 on Linux, Beyond Compare (not free) on Mac, or the cross-platform meld.
Another feature we did not include in Studio is the ability to create graphs directly in the GDX viewer. We feel that other, external tools such as Excel are much better at this, and copying data into Excel to plot them can be done with a couple of clicks.
To find out more about GAMS Studio, have a look at the documentation. And as always, if you have the feeling something is not working as expected or there is an important feature missing, please do not hesitate to let us know at support@gams.com