Table of Contents
- Versions
- Getting started
- Overivew of API Classes
-
How to use the API
- Choose the GAMS system
- Export data to GDX
- Import data from GDX
- Run a GAMSJob from file
- Retrieve a solution from an output database
- Specify the solver using GAMSOptions
- Run a job with a solver option file and capture its log output
- Use include files
- Set a non-default working directory
- Read data from string and export to GDX
- Run a job using data from GDX
- Run a job using implicit database communication
- Define data using Java data structures
- Prepare a GAMSDatabase from Java data structures
- Initialize a GAMSCheckpoint by running a GAMSJob
- Initialize a GAMSJob from a GAMSCheckpoint
- Run multiple GAMSJobs in parallel using a GAMSCheckpoint
- Create a GAMSModelInstance from a GAMSCheckpoint
- Modify a parameter of a GAMSModelInstance using GAMSModifier
- Modify a variable of a GAMSModelInstance using GAMSModifier
- Use a queue to solve multiple GAMSModelInstances in parallel
- Fill a GAMSDatabase by reading from MS Access
- Fill a GAMSDatabase by reading from MS Excel
- Create and use a save/restart file
The goal of this tutorial is to provide a compact overview of the basic functionality of the Java Control API. It allows the user to start immediately working with the API by providing a set of small examples based on the well-known transportation problem. These examples introduce several API features step by step.
- Versions An overview of different Java Control API versions.
- Getting started A quick introduction about how to compile and run a program from command line or an IDE.
- Overivew of API Classes Overview of some fundamental classes of the Java Control API.
- How to use the API An extensive set of examples on how to use API components.
Versions
As of current GAMS Distribution, there are two versions of Java Control API.
- One requires Java SE 11 or above to compile and run available since GAMS 44.1.0 release. This version offers the latest and updated Control API functionalities.
- Another requires Java SE 8 or above to compile and run. This version does not offer new and/or updated Control API functionalities that has been released after GAMS 43.1.0 release, only major bugfixes are provided. This version provides support for Java program that still requires Java SE 8 to compile and run, and is subjected to removal in the future release once the period of Java SE 8 extended support comes to an end.
The two version of Java Control API share basic functionalities. The tutorial should apply to both versions unless explicitly stated otherwise. See Overivew of API Classes for an overview of available classes.
Getting started
For all platforms, assume GAMS system has been installed at [PathToGAMS] directory, called GAMS directory. The directory [PathToGAMS] denotes the path setting according to your GAMS installation on targeted platforms. For instance
- on Windows-based platforms with GAMS distribution 54.2 installed,
[PathToGAMS]denotesC:\GAMS\54 - on Unix-based platforms with GAMS distribution 54.2 installed,
[PathToGAMS]denotes/opt/gams/gams54.2_linux_x64_64_sfx
All Java Control API classes are contained within one single jar file GAMSJavaAPI.jar (or GAMSJavaAPI-8.jar for Java SE 8) with a namespace com.gams.api. The jar files are distributed with the current GAMS distribution and located at
- on Windows-based platforms:
[PathToGAMS]\apifiles\Java\api\GAMSJavaAPI.jar
- on Unix-based platforms:
[PathToGAMS]/apifiles/Java/api/GAMSJavaAPI.jar
- Note
- Since GAMS 44.1.0 release, Java Control API has an additional dependency on JSON.simple, a simple Java library for JSON processing, read and write JSON data. Compiling and running a program that uses
GAMSJavaAPI.jarrequiresjson-simple-1.1.1.jarto be in the same directory asGAMSJavaAPI.jar(This is not the case forGAMSJavaAPI-8.jarfor Java SE 8). Missingjson-simple-1.1.1.jarfrom the same directory might raise runtime exception when using related functionality in the Java Control API.
There are two different approaches of how to use the Java Control API. Either the Java source files can be edited with any common editor and compiled from command line or a Java IDE can be used. The following sections give a quick introduction about the different possibilities.
Compiling a Program
To compile a Java program, one usually provides the following information to Java compiler:
- the directory(ies) containing all required Java class files
- the directory to place the generated class files
- the name of the Java source file
A Java program that uses Java Control API requires class files that are contained in GAMSJavaAPI.jar for compilation (or in GAMSJavaAPI-8.jar for Java SE 8).
Compiling a Program from Command Line
To compile a Java program that uses Java Control API, for instance HelloAPI.java, at the command line:
javac -cp [CLASSPATH] -d [TARGETDIR] HelloAPI.java
where
[CLASSPATH]  is 'GAMSJavaAPI.jar' (or `GAMSJavaAPI-8.jar` for Java SE 8) with its location,
             as it contains class files that are used by 'HelloAPI.java'.
             On Windows-based platform, [CLASSPATH] denotes
                 [PathToGAMS]\apifiles\Java\api\GAMSJavaAPI.jar
             On Unix-based platforms, [CLASSPATH] denotes
                 [PathToGAMS]/apifiles/Java/api/GAMSJavaAPI.jar

[TARGETDIR] is the directory to place the generated classe file.- Note
- it is possible to add
[CLASSPATH]to yourCLASSPATHenvironment variable of the operating system as an alternative to specifying-cp [CLASSPATH]. -d [TARGETDIR]is optional. In case-d [TARGETDIR]is omited and the compilation is successful, the class file will be generated and located under the current directory.GAMSJavaAPI.jarhas an additional dependency onjson-simple-1.1.1.jar(not the case forGAMSJavaAPI-8.jar). Though it is not necessary to addjson-simple-1.1.1.jarto[CLASSPATH]as it already been added into theGAMSJavaAPI.jar's Classpath. It is important, however, forjson-simple-1.1.1.jarto be in the same directory asGAMSJavaAPI.jar.
- it is possible to add
To compile other programs, change the arguments accordingly. See also Compile and run examples from the GAMS system directory.
Compiling a Program from Java IDE
In case of compiling a program under a Java IDE (for instance, Eclipse, NetBeans, or IntelliJ), the location of the jar file GAMSJavaAPI.jar (or GAMSJavaAPI-8.jar for Java SE 8) shall be added into the Java build path of the IDE's project properties.
For an Eclipse user, see Import an Eclipse Java Project from the GAMS system directory.
Running a Program
To run a Java program, one usually provide the following information to Java Virtual Machine:
- the directory(ies) containing all required Java classes
- the directory(ies) containing all required shared libraries
- the name of an entry point class (in most case containing main method)
A Java program that uses Java Control API requires a number of shared libraries for establishing a connection with GAMS software components during run time. These shared libraries are platform dependent and they are located at [PathToGAMS]/apifiles/Java/api directory.
Running a Program from Command Line
To run a Java program that uses Java Control API, for instance HelloAPI.class containing in [TARGETDIR] directory, at the command line type:
java -cp [CLASSPATH] HelloAPI
where
[CLASSPATH]  is the list of two paths, a path of 'GAMSJavaAPI.jar' (or `GAMSJavaAPI-8.jar` for Java SE 8)
             and a path of targeted directory containing 'HelloAPI.class', separated by path separator
             on the targeted platform.
             On Windows-based platform, [CLASSESPATHS] denotes
                 [PathToGAMS]\apifiles\Java\api\GAMSJavaAPI.jar;[TARGETDIR]
             On Unix-based platform, [CLASSESPATHS] denotes
                 [PathToGAMS]/apifiles/Java/api/GAMSJavaAPI.jar:[TARGETDIR]

HelloAPI     is the name of an entry point class containing main method
Please note that it is possible to add [CLASSPATH] to your CLASSPATH environment variable of the operating system as an alternative to specify -cp [CLASSPATH].
- Attention
- Most operations performed by Java Contorl API such as gdx or options operations require shared libraries (located in the folder
[PathToGAMS]/apifiles/Java/apiby default) when running a program. It is recommended to specify the path to shared libraries when running a program. In case nojava.library.pathhas been specified when running a program, the Java API will determine the path of the shared libraries from the java class path containingGAMSJavaAPI.jar(orGAMSJavaAPI-8.jarfor Java SE 8).
It is possible to specify the path to shared libraries by passing the following argument to Java Virtual Machine:
-Djava.library.path=[LIBRARYPATH]
where [LIBRARYPATH] describes the list of paths containing all required shared libraries (as previously mentioned, it is [PathToGAMS]/apifiles/Java/api by default). In such case, the Java API will give priority to the java library path when loading all required JNI libraries during run time. The java API will raise an exception when either the java virtual machine fails to load the required libraries from the specified java library path or there is a version conflict of shared libraries during run time.
To run other programs, change the arguments accordingly. See also Compile and run examples from the GAMS system directory.
Running a Program from Java IDE
In case of running a program under a Java IDE (for instance, Eclipse, NetBeans, or IntelliJ), it is possible to set the nessary arguments via the properties of the IDE project.
For an Eclipse user, see Import an Eclipse Java Project from the GAMS system directory.
Setting Up Your Environment
Since GAMS 24.3 release, the GAMS system directory can be specified within the program during run time. Therefore the setting up of execution environment before running a program is no longer required (see also Release Notes 24.3).
Nevertheless, it is still possible to preconfigure the GAMS system directory before running a program and use the default workspace setting within a program. In the default setting, GAMS system directory is not specified by a user within the program. The directory will be searched during run time from environment variable in the following order (depends on the target platform):
- On Windows-based platform: first from
PATHenvironment variable. If not found, from the platform windows registrygams.location, - On macOS-based platform: first from
PATHenvironment variable. If not found, fromDYLD_LIBRARY_PATH, - On other Unix-based platfrom: from
PATHenvironment variable. If not found, fromLD_LIBRARY_PATH.
The following examples illustrate how to add [PathToGAMS] into the environment variable PATH on different platforms:
- On Windows 2000, XP, Vista, or Windows 7 desktop:
> right-click on 'My Computer'
> choose 'Properties' (alternatively, click on 'System' icon in the control panel)
> click on 'Advanced' tab (or 'Advance system settings')
> click on 'Environment Variables'
> edit 'PATH' by adding [PathToGAMS] to the variable using a semi-colon as a separator.
- On Window-based platform via command line terminal:
set PATH=[PathToGAMS];%PATH%
- On Unix-based platform via command line terminal using Bourne shell and its derivatives:
export PATH=[PathToGAMS]:${PATH} - On Unix-based platform via command line terminal using C Shell:
setenv PATH [PathToGAMS]:${PATH}
Compile and run examples from the GAMS system directory
GAMS provides several examples to demonstrate how to use Java Control API. These examples are located in the [PathToGAMS]/apifiles/Java directory containing various examples based on the different optimization problems. The following explanations guide you through the compilation and execution process of one example based on the well-known transportation problem, assuming that Java Runtime System is already installed on your machine.
For instance, Transport1.java under the directory [PathToGAMS]/apifiles/Java/transport demonstrates how to retrieve GAMS transport model from GAMS Model Library, execute the model with various GAMS options, and extract results after execution.
To compile Transport1.java at the command line under the directory [PathToGAMS]/apifiles/Java/transport:
javac -cp [CLASSPATH] -d [TARGETDIR] Transport1.java
where
[CLASSPATH]  is a location of 'GAMSJavaAPI.jar' (or `GAMSJavaAPI-8.jar` for Java SE 8),
             as it contains classes files that are used by 'Transport1.java'.
             On Windows-based platform, [CLASSPATH] denotes
                [PathToGAMS]\apifiles\Java\api\GAMSJavaAPI.jar;
             On Unix-based platforms, [CLASSESPATHS] denotes
                [PathToGAMS]/apifiles/Java/api/GAMSJavaAPI.jar

[TARGETDIR]  is the destination directory to place the generated classed file.
As Transport1.java is declared under package com.gams.examples.transport, the output class file will be located in [TARGETDIR] under the directory structure corresponding to package information. This means the compiled output file Transport1.class is located under:
[TARGETDIR]\com\gams\examples\transporton Windows-based platform, or[TARGETDIR]/com/gams/examples/transporton Unix-based platforms.
To run Transport1.class from the command line:
java -cp [CLASSPATH] com.gams.examples.transport.Transport1
where
[CLASSPATH]  is the list of two paths, 'GAMSJavaAPI.jar' (or `GAMSJavaAPI-8.jar`
             for Java SE 8) with its path and a directory containing 'Transport1.class'
             and (in this case [TARGETDIR] from the compilation step), separated by
             path separator on the targeted platform.
             On Windows-based platform, [CLASSESPATHS] denotes
                [PathToGAMS]\apifiles\Java\api\GAMSJavaAPI.jar;[TARGEDIR]
             On Unix-based platforms, [CLASSESPATHS] denotes
                [PathToGAMS]/apifiles/Java/api/GAMSJavaAPI.jar:[TARGEDIR]
Please note that the path [TARGETDIR] can be either absolute or relative path representing the directory that contains Transport1.class.
To compile and run other examples under the directory [PathToGAMS]/apifiles/Java, adjust the arguments accordingly.
See How to use the API for detailed explanations on the series of transportation problem examples located in the folder [PathToGAMS]/apifiles/Java/transport.
Import an Eclipse Java Project from the GAMS system directory
Since GAMS 24.2 release there is an prepared Java project that can be imported into Eclipse. The project is located in folder [PathToGAMS]/apifiles/Java/Eclipse and contains the examples based on the transportation problem. The following explanations guide you through the import and preparation process, assuming that the Eclipse Java IDE is already installed on your machine.
To import the project located in folder [PathToGAMS]/apifiles/Java/Eclipse into the workspace:
- open the Eclipse IDE with the chosen workspace location, click on File menu and choose Import.
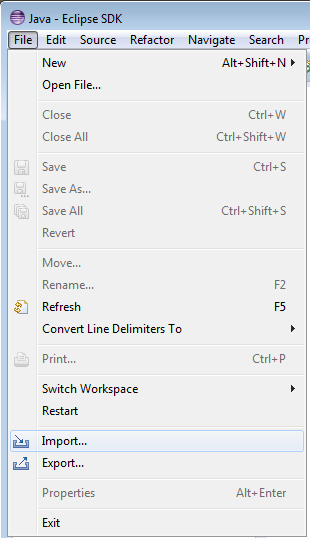
- In the Import window, choose General > Existing Projects into Workspace then click Next.
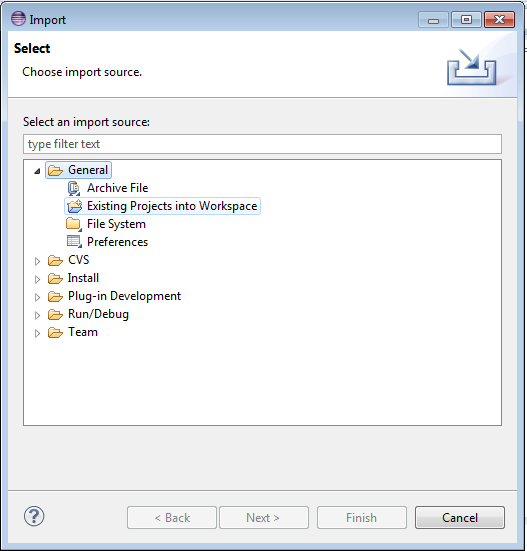
In the next page of Import window, click Browse.. and select the folder with the prepared project (
[PathToGAMS]/apifiles/Java/Eclipse) as root directory.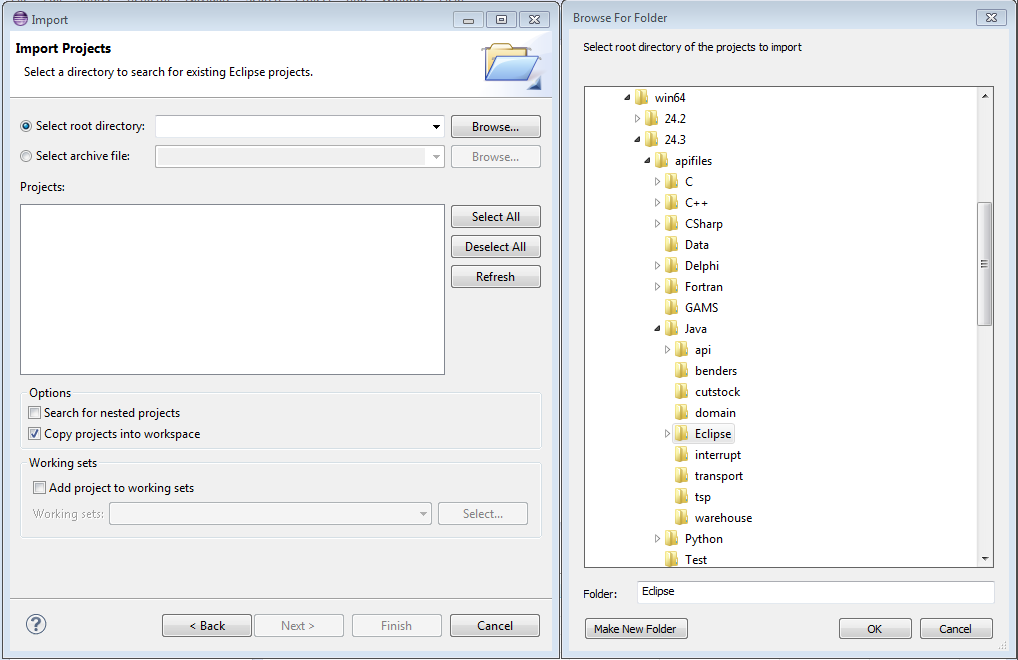
We recommend to check for option Copy projects into workspace. Click Finish to finish the Import window.

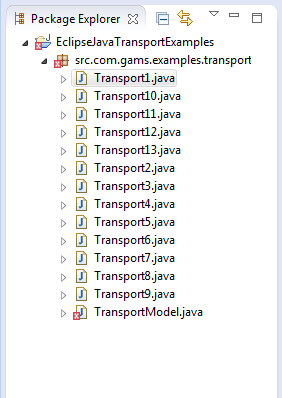
- Now the project is imported, and appears in the Package Explorer window on the left hand side of of the IDE (shown below with its elements expanded).
- As every example in the project requires Java Control API classes files to compile (all classes are packaged in
GAMSJavaAPI.jarlocated in the folder[PathToGAMS]/apifiles/Java/api), you need to tell eclipse where to findGAMSJavaAPI.jar. To do this, either click on the project then choose Project > Properties or right click on the project name and choose Properties .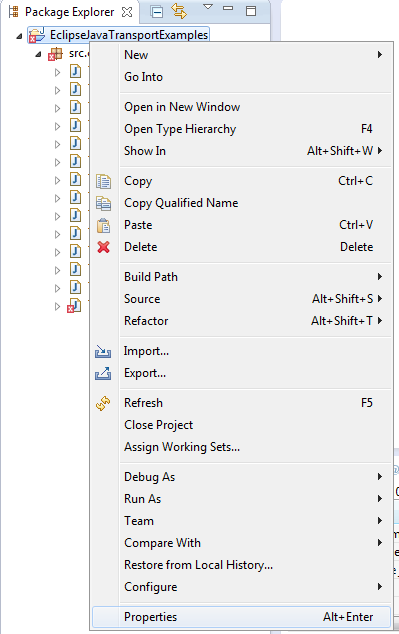
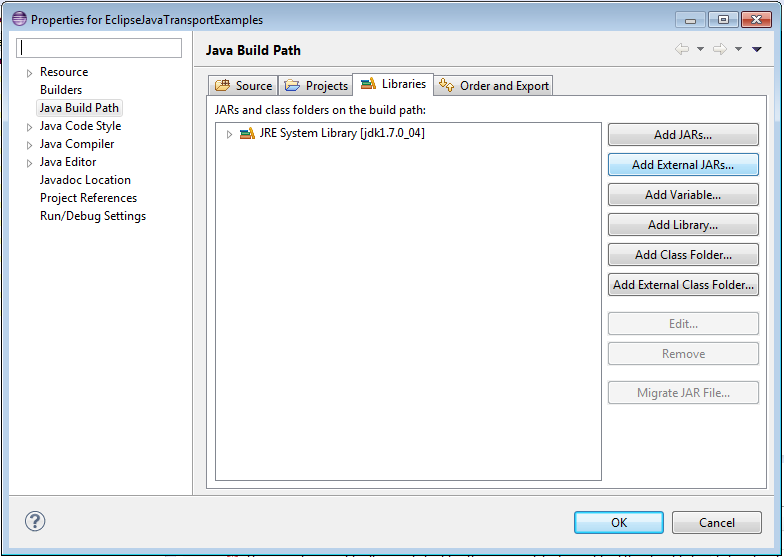
The Properties window of the proejct appears. Click Java Build Path on the left of the window, choose Libraries tab, choose Add External JARs....
select
GAMSJavaAPI.jarlocated in the folder[PathToGAMS]/apifiles/Java/apito be opened.
and click OK to finish adding
[PathToGAMS]/apifiles/Java/api/GAMSJavaAPI.jarto Java Build Path.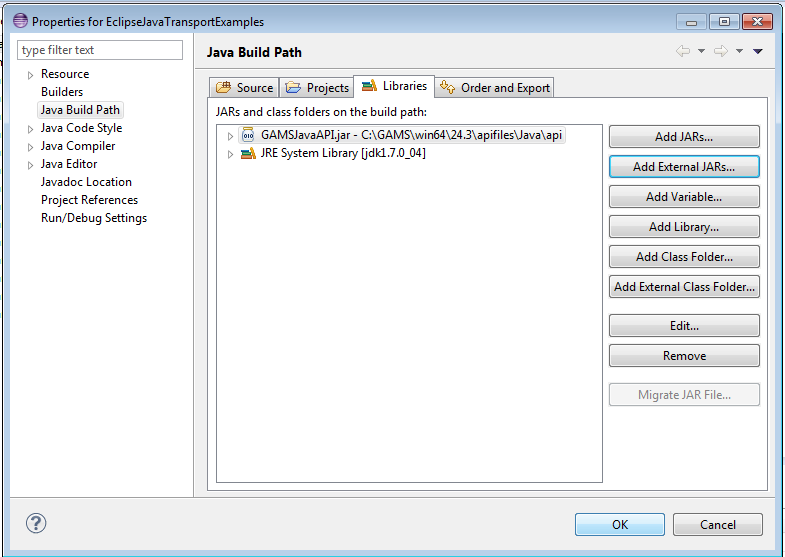
- Now all the java files should be successfully compiled without errors except for
Transport9andTransport10(unsuccessful compilation is denoted with red x mark in front of the file name). This is becauseTransport9andTransport10requires an additional JAR file (ucanaccesss*.jarfrom ucanacess forTransport9andjxl.jarfrom jexcelapi forTransport10). The jar file can be downloaded and unzipped the downloaded archive into a local directory e.g.C:\tools. Then the jar fileC:\tools\ucanaccess*.jarand/orC:\tools\jxl.jarcan be added to the the Java Build Path of the project in a similar way as explained in 6.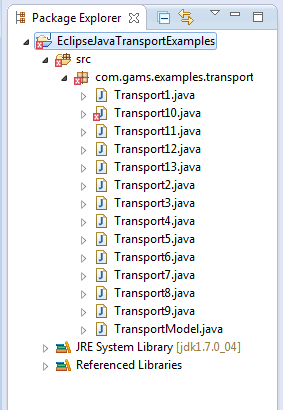
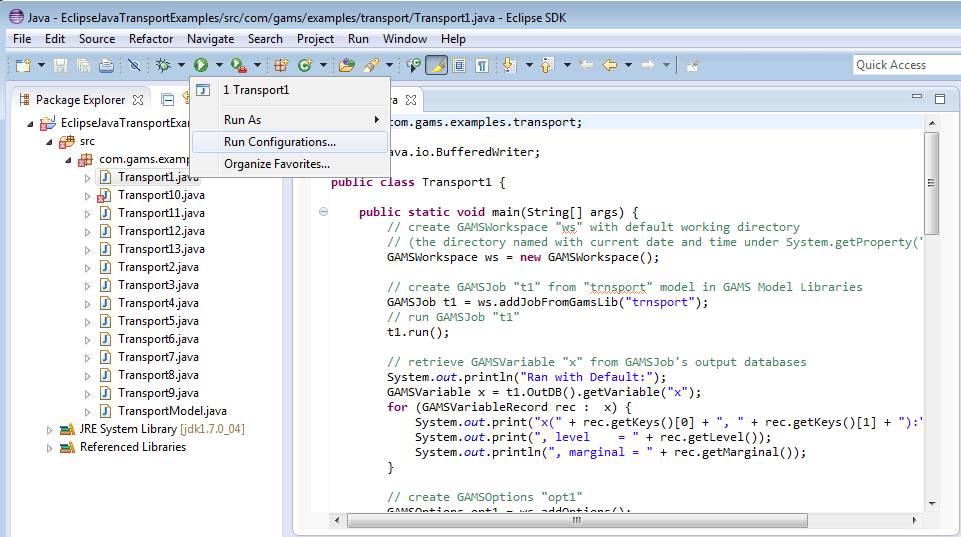
To run a transport example, for example
Transport1, you need to create aRun Configuration.To do this, either click Run menu and choose Run Configurations...
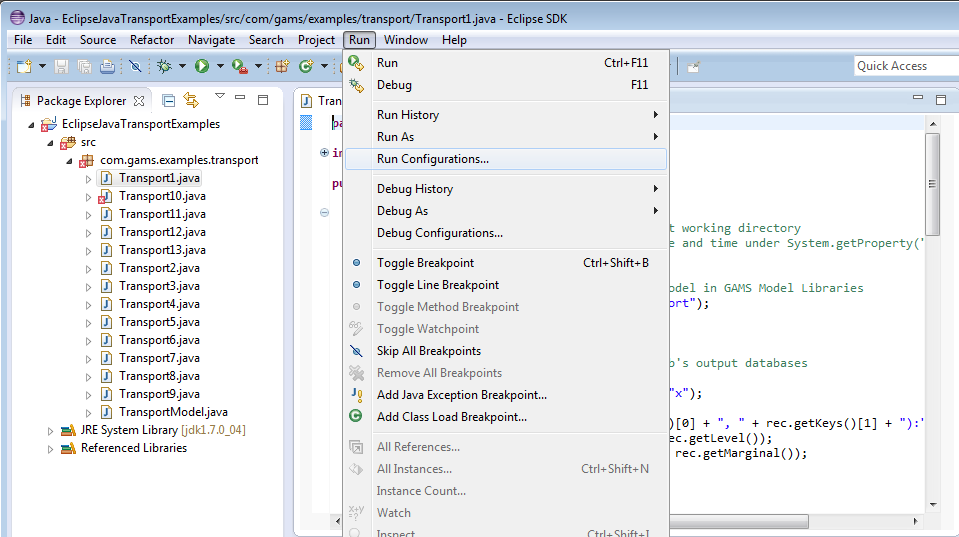
or open the drop down menu next to the run button and click on Run Configurations....
Then create a new run configuration by either press the New button in the left hand side of the window or right click at Java Application in the left hand side of the window and choose New.

The run configuration for
Transport1appears.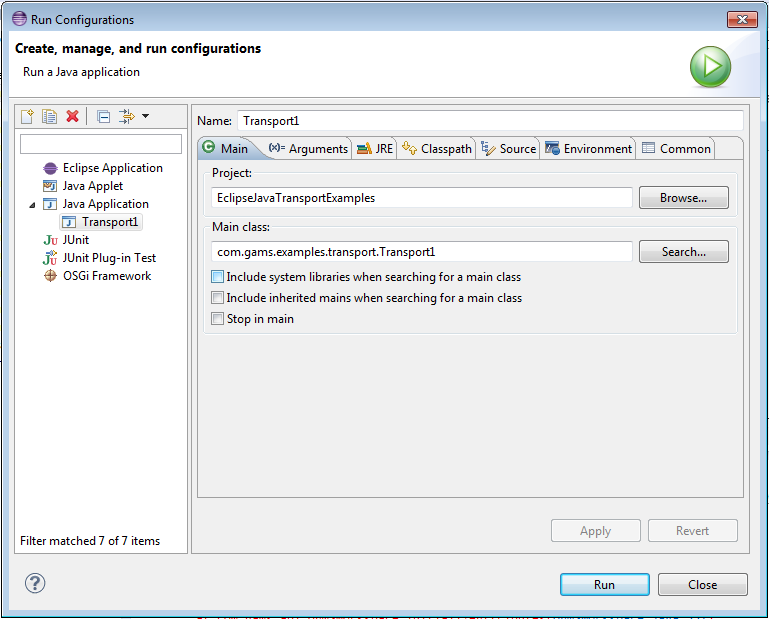
For each run configuration it is possible to configure the execution of a program, such as the arguments of the virtual machine, class paths, environment variables and so on.
For instance, to specify the
java.library.pathforTransport1run configuration, choose Arguments tab in the run configuration and specify-Djava.library.path=[PathToGAMS]/apifiles/Java/apias one of the VM arguments. Then Click Apply and Run.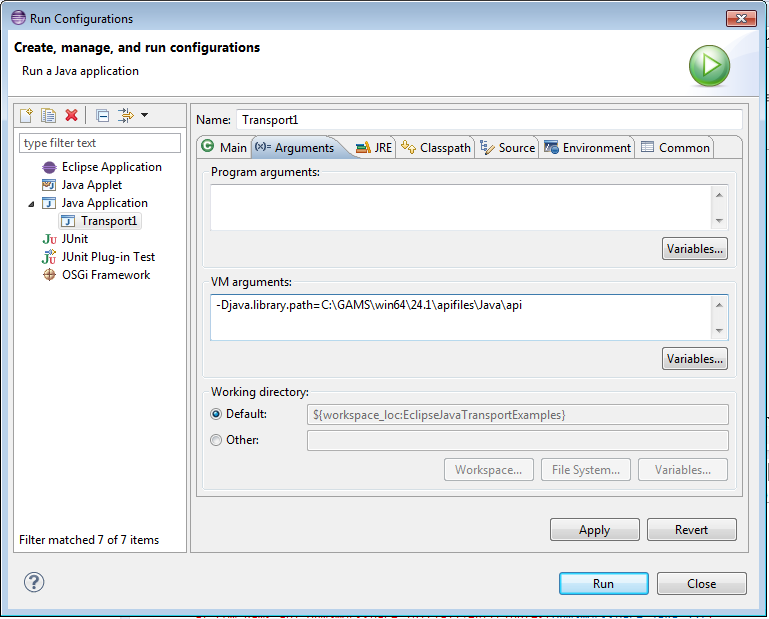
Note that the run configuration described in 8. and 9. is needed to be set for every single example. Once this is done you should be able to use the run configuration to repeat the execution of all the transport examples.
For a more detailed explanations on each transport examples see How to use the API.
Overivew of API Classes
This section provides a quick overview of some fundamental classes of the Java Control API. Their usage is demonstrated by an extensive set of examples. All API classes are with a namespace com.gams.api containing within one single jar file, depending on which Control API version either GAMSJavaAPI.jar (requires Java SE 11 or above) or GAMSJavaAPI-8.jar (requires Java SE 8 or above). The jar file provides objects to interact with the General Algebraic Modeling System (GAMS).
Objects in this namespace help to create and run GAMS models (GAMSJob) that can be customized by GAMS options (GAMSOptions), allow an exchange of input data and model results (GAMSDatabase) which consists of a collection of symbols (GAMSSymbol) corresponding to GAMS data types (GAMSSet to Set, GAMSParameter to Parameter, GAMSGAMSVariable t0 Variable, and GAMSEquation tp Equation). Furthermore, it provides a way to save the information provided in input files in intermediate files and restart execution (GAMCheckpoint). It also introduces a way to solve a sequence of closely related models in the most efficient way (GAMSModelInstance).
See classes for the complete list of all defined classes and descriptions. All listed classes are available for the Control API version that requires Java SE 11 or above. Classes that are not available in the Control API version that targets Java SE 8 or above, are classes that support and manage the execution of a GAMS program given by GAMS model source for GAMS Engine (GAMSEngineJob, GAMSEngineConfiguration, and GAMSEngineRunParameters ).
How to use the API
In the GAMS system directory there are some examples provided that illustrate the usage of the Java Control API. [PathToGAMS]/apifiles/Java/transport contains multiple examples dealing with the well-known transportation problem. In further course of this tutorial we discuss these examples step by step and introduce new elements of the API in detail.
We recommend to open the aforementioned files to gain a complete overview of the examples. Down below we explain the examples with the help of selected code snippets.
- Choose the GAMS system
- Export data to GDX
- Import data from GDX
- Run a GAMSJob from file
- Retrieve a solution from an output database
- Specify the solver using GAMSOptions
- Run a job with a solver option file and capture its log output
- Use include files
- Set a non-default working directory
- Read data from string and export to GDX
- Run a job using data from GDX
- Run a job using implicit database communication
- Define data using Java data structures
- Prepare a GAMSDatabase from Java data structures
- Initialize a GAMSCheckpoint by running a GAMSJob
- Initialize a GAMSJob from a GAMSCheckpoint
- Run multiple GAMSJobs in parallel using a GAMSCheckpoint
- Create a GAMSModelInstance from a GAMSCheckpoint
- Modify a parameter of a GAMSModelInstance using GAMSModifier
- Modify a variable of a GAMSModelInstance using GAMSModifier
- Use a queue to solve multiple GAMSModelInstances in parallel
- Fill a GAMSDatabase by reading from MS Access
- Fill a GAMSDatabase by reading from MS Excel
- Create and use a save/restart file
Choose the GAMS system
Example: Transport1
By default the GAMS system is determined automatically. In case of having multiple GAMS systems on your machine, the desired system can be specified via an additional argument when the workspace is created. When running the examples, we can provide an additional command line argument in order to define the GAMS system directory that should be used. By executing Transport1.exe with C:/GAMS/54 we use GAMS 54 to run Transport1 even if our default GAMS system might be a different one. This is managed by the following code:
Remember that the bitness of the GAMS system has to match the bitness of your Java Runtime Environment.
Export data to GDX
Example: TransportGDX
Although the Java Control API offers much more than exchanging data between Java and GDX, a common use case is the export and import of GDX files. The central class for this purpose is GAMSDatabase. We assume that the data to be exported is available in Java data structures.
Different type of GAMS symbols are represented using different Java data structures. The data for the GAMS sets is represented using List of Strings (e.g. plants and markets). On the other hand, GAMS parameters are represented by Map (e.g. capacity and demand). Note that the representation of the two dimensional parameter distance uses Vectors for storing the keys. The choice of data structures can also be different, but the used structures in this example fit well for representing GAMS data with Java data structures.
A new GAMSDatabase instance can be created using GAMSWorkspace.addDatabase.
We start adding GAMS sets using the method GAMSDatabase.addSet which takes the name and the dimension as arguments. The third argument is an optional explanatory text. A for-loop iterates through plants and adds new records to the recently created GAMSSet instance i using GAMSSet.addRecord.
GAMSParameter instances can be added by using the method GAMSDatabase.addParameter. In this example we use the overloaded method which takes a list of GAMSSet instances instead of the dimension for creating a parameter with domain information.
As soon as all data is prepared in the GAMSDatabase, the method GAMSDatabase.export can be used to create a GDX file.
Import data from GDX
Example: TransportGDX
Data can be imported from a GDX file using GAMSWorkspace.addDatabaseFromGDX. The method takes a path to a GDX file and creates a GAMSDatabase instance.
Reading the data from the GAMSSet i into a List of Strings can be done as follows:
A new List gdxPlants is created. i is retrieved by calling GAMSDatabase.getSet on gdxdb. The returned GAMSSet object can be iterated using a for-loop to access the records of the set. Each record is of type GAMSSetRecord and can be asked for its keys.
You can do the same for GAMSParameter. Instead of creating a List, we want to have the data in the form of a Map. GAMSParameterRecord can not only be asked for its keys, but also for its value. The following code snippet shows how to read the one dimensional parameter a into a Map<String, Double>.
For a key of multi dimensional symbol, we choose Vector of String instead of String.
Scalar can be read into a variable of type double by accessing the value of the first and only record.
Run a GAMSJob from file
Example: Transport1
At first we create our workspace using GAMSWorkspace ws = new GAMSWorkspace();. Afterward we can create a GAMSJob t1 using the addJobFromGamsLib method and run it.
Apparently you can create a GAMSJob with any other gms file you might have created on your own as long as it is located in the current working directory. Then the GAMSJob t1 can be defined using the GAMSJob.addJobFromFile method.
See also Transport1.java.
Retrieve a solution from an output database
Example: Transport1
The following lines create the solution output and illustrate the usage of the GAMSJob.OutDB property to get access to the GAMSDatabase created by the run method. To retrieve the content of variable x we use the getVariable method and the GAMSVariableRecord class.
See also Transport1.java.
Specify the solver using GAMSOptions
Example: Transport1
The solver can be specified via the GAMSOptions class and the GAMSWorkspace.addOptions method. The GAMSOptions.setAllModelTypes property sets xpress as default solver for all model types which the solver can handle. Then we run our GAMSJob t1 with the new GAMSOptions.
See also Transport1.java.
Run a job with a solver option file and capture its log output
Example: Transport1
At first we create the file xpress.opt with content algorithm=barrier which will be used as solver option file and is stored in the current working directory. Afterward we use a GAMSOptions just like in the preceding example and GAMSOptions.setOptFile property to 1 to tell the solver to look for a solver option file. We specify the argument output in order to stream the log of the GAMSJob into the file transport1_xpress.log. When the output argument is omitted then the log will be written to standard output.
See also Transport1.java.
Use include files
Example: Transport2
In this example, as in many succeeding, the data text and the model text are separated into two different strings. Note that these strings data and model are using GAMS syntax.
At first we write an include file tdata.gms that contains the data but not the model text:
Afterwards we create a GAMSJob using the GAMSWorkspace.addJobFromString method. GAMSOptions.defines is used like the 'double dash' GAMS parameters, i.e. it corresponds to --incname=tdata on the command line where incname is used as name for the include file in the model string.
The string model contains the following lines to read in the data.
See also Transport2.java.
Set a non-default working directory
Example: Transport3
At first we create a new directory. Once this is done we can use this directory when creating the GAMSWorkspace and make it the working directory.
See also Transport3.java.
Read data from string and export to GDX
Example: Transport3
We read the data from the string data. Note that this contains no model but only data definition in GAMS syntax. By running the corresponding GAMSJob a GAMSDatabase is created that is available via the GAMSJob.OutDB property. We can use the GAMSDatabase.export method to write the content of this database to a gdx file tdata.gdx.
See also Transport3.java.
Run a job using data from GDX
Example: Transport3
This works quite similar to the usage of an include file explained in Transport2 - Use include files .
Note that there are some minor changes in model due to the usage of a gdx instead of an include file.
See also Transport3.java.
Run a job using implicit database communication
Example: Transport3
This example does basically the same as the two preceding examples together. We create two GAMSJobs t3a and t3b where the first one contains only the data and the second one contains only the model without data. After running t3a the corresponding OutDB can be read in directly just like a gdx file. Note that the database needs to be passed to the GAMSJob.run method as additional argument.
See also Transport3.java.
Define data using Java data structures
Example: Transport4
We use the List<E> class and the Map<Key,Value>to define Java data structures that correspond to the sets, parameters and tables used for the data definition in GAMS.
See also Transport4.java.
Prepare a GAMSDatabase from Java data structures
Example: Transport4
At first we create an empty GAMSDatabase db using the GAMSWorkspace.addDatabase method. Afterwards we prepare the database. To add a set to the database we use the GAMSSet class and the GAMSDatabase.addSet method with arguments describing the identifier, dimension and explanatory text. To add the records to the database we iterate over the elements of our Java data structure and add them by using the GAMSSet.addRecord method.
For parameters the procedure is pretty much the same. Note that the table that specifies the distances in GAMS can be treated as parameter with dimension 2 and that scalars can be treated as parameter with dimension 0.
The GAMSJob can be run like explained in the preceding example about implicit database communication.
See also Transport4.java.
Initialize a GAMSCheckpoint by running a GAMSJob
Example: Transport5
The following lines of code conduct several operations. While the first line simply creates a GAMSCheckpoint, the second one uses the GAMSWorkspace.addJobFromString method to create a GAMSJob containing the model text and data but no solve statement. Afterwards the run method gets the GAMSCheckpoint as argument. That means the GAMSCheckpoint cp captures the state of the GAMSJob.
See also Transport5.java.
Initialize a GAMSJob from a GAMSCheckpoint
Example: Transport5
Note that the string returned from function model contains the entire model and data definition plus an additional demand multiplier and scalars for model and solve status but no solve statement:
In Transport5 we create a list with eight different values for this demand multiplier.
For each entry of that list we create a GAMSJob t5 using the GAMSWorkspace.addJobFromString method. Besides another string which resets the demand multiplier bmult, specifies the solve statement and assigns values to the scalars ms and ss we pass the checkpoint cp as additional argument. This results in a GAMSJob combined from the checkpoint plus the content provided by the string. We run the GAMSJob and echo some interesting data from the OutDB using the GAMSDatabase.getParameter and GAMSDatabase.getVariable methods, the GAMSParameter.findRecord and GAMSVariable.findRecord methods plus the GAMSParameterRecord.getValue property and the GAMSVariableRecord.getLevel method.
- Note
- Some of demand multipliers cause infeasibility. Nevertheless, GAMS keeps the incumbent objective function value. Therefore the model status and the solve status provide important information for a correct solution interpretation.
See also Transport5.java.
Run multiple GAMSJobs in parallel using a GAMSCheckpoint
Example: Transport6
This example illustrates how to run the jobs known from Transport5 in parallel. We initialize the GAMSCheckpoint cp and introduce a demand multiplier as we did before :
Furthermore, we introduce a new object lockObject that will be used to avoid mixed up output from the parallel jobs. We create one scenario for each entry of bmultlist and cause a thread to begin execution.
In class Scenario a GAMSJob t6 is created and run just like in the preceding example of Transport5. The output section is also the same except for the fact that it is 'locked' by the object lockObject which means that the output section cannot be executed simultaneously for multiple demand multipliers.
While the output in Transport5 is strictly ordered subject to the order of the elements of bmultlist in Transport6 the output blocks might change their order but the blocks describing one scenario are still appearing together due to the lockObject.
If you want a further impression of the impact of the lockObject, just rerun Transport6 but comment out the lock as follows and compare the output.
See also Transport6.java.
Create a GAMSModelInstance from a GAMSCheckpoint
Example: Transport7
In Transport7 the usage of com::gams::api::GAMSModelInstance is demonstrated.
At first checkpoint cp is created as in the preceding examples. Then we create the GAMSModelInstance mi using the GAMSCheckpoint.addModelInstance method. Note that the GAMSJob again contains no solve statement and the demand multiplier is already included with default value 1.
See also Transport7.java.
Modify a parameter of a GAMSModelInstance using GAMSModifier
Example: Transport7
A GAMSModelInstance uses a SyncDB to maintain the data. We define bmult as GAMSParameter using the GAMSParameter method and specify gurobi as solver. Afterwards the GAMSModelInstance is instantiated with 3 arguments, the solve statement, GAMSOptions opt and GAMSModifier bmult. The GAMSModifier means that bmult is modifiable while all other parameters, variables and equations of ModelInstance mi stay unchanged. We use the GAMSParameter.addRecord method and the setValue function to assign a value to bmult. That value can be varied afterwards using the GAMSParameter.getFirstRecord method to reproduce our well-known example with different demand multipliers.
See also Transport7.java.
Modify a variable of a GAMSModelInstance using GAMSModifier
Example: Transport7
We create a GAMSModelInstance just like in the next to last example. We define x as GAMSVariable and its upper bound as GAMSParameter xup. At the following instantiate method GAMSModifier has 3 arguments. The first one says that x is modifiable, the second determines which part of the variable (lower bound, upper bound or level) can be modified and the third specifies the GAMSParameter that holds the new value.
In the following loops we set the upper bound of one link of the network to zero, which means that no transportation between the corresponding plant and market is possible, and solve the modified transportation problem.
See also Transport7.java.
Use a queue to solve multiple GAMSModelInstances in parallel
Example: Transport8
We initialize a GAMSCheckpoint cp from a GAMSJob. Then we define a queue that represents the different values of the demand multiplier. A queue follows the first-in-first-out principle The object IOLockObject is used later to avoid messed up output. Then we call Scenarios multiple times in parallel. The number of parallel calls is specified by numberOfWorkers.
In class Scenarios we create and instantiate a GAMSModelInstance as in the preceding examples and make parameter bmult modifiable. Note that we chose cplex as solver because it is thread safe (gurobi would also be possible). Once the queue is empty the loop terminates.
See also Transport8.java.
Fill a GAMSDatabase by reading from MS Access
Example: Transport9
This example demonstrates how to read an input data for GAMS Transport model from Microsoft Access file (transport.accdb) to a GAMSDatabase. The example uses UCanAccess, an open source JDBC Driver implementation for Microsoft Access Database to read/write read/write a Microsoft Access database file (transport.accdb). Note that the installation and configuration of Microsoft Access are out of scope of this tutorial.
At first we have to add an additional jar file to the [CLASSESPATH] since we use the Java Excel API which can be downloaded from UCanAccess. We unzipped the downloaded into C:\tools. To compile and run eg. on a Windows platform from the command line go to C:\GAMS\[gams-version]\apifiles\Java\transport and use:
javac -cp C:\GAMS\[gams-version]\apifiles\Java\api\GAMSJavaAPI.jar;C:\tools\ucanacces-[version].jar;. -d . Transport9.java
and
java -cp C:\GAMS\[gams-version]\apifiles\Java\api\GAMSJavaAPI.jar;C:\tools\ucanacces-[version].jar;. com.gams.examples.transport.Transport9
If you are using an IDE like Eclipse add C:\tools\ucanacces-[version] to the class path as explained in the Compiling a Program from Java IDE and Running a Program from Java IDE section.
The model is given as string without data like in many examples before and the Access file transport.accdb is located at [gamsdir]\apifiles\Data.
We call a function readDataFromAccess that finally returns a GAMSDatabase as shown below.
The function readDataFromAccess begins with the creation of an empty database. Afterwards we set up a connection to the MS Access database by specifying the aforementioned data source name. To finally read in GAMS sets and parameters we call the functions readSet and readParameter.
The function readSet adds a set to the GAMSDatabase that is filled with the data from the MS Access file afterwards. The function readParameter works quite similar.
Once we read in all the data we can create a GAMSJob from the GAMSDatabase and run it as usual.
See also Transport9.java.
Fill a GAMSDatabase by reading from MS Excel
Example: Transport10
This example illustrates how to read data from Excel, or to be more specific, from [PathToGAMS]\apifiles\Data\transport.xlsx.
At first we have to add an additional jar file to the [CLASSESPATH] since we use the Java Excel API which can be downloaded from jexcelapi. We unzipped the Java Excel API folder in C:\tools. To compile and run on a Windows platform from the command line go to C:\GAMS\[gams-version]\apifiles\Java\transport and use:
javac -cp C:\GAMS\[gams-version]\apifiles\Java\api\GAMSJavaAPI.jar;C:\tools\jxl.jar;. -d . Transport10.java
and
java -cp C:\GAMS\[gams-version]\apifiles\Java\api\GAMSJavaAPI.jar;C:\tools\jjxl.jar;. com.gams.examples.transport.Transport10
If you are using an IDE like Eclipse add C:\tools\jxl.jar to the class path as explained in the Compiling a Program from Java IDE and Running a Program from Java IDE section.
The model is given as string without data like in many examples before and the Excel file transport.xlsx is located at [gamsdir]\apifiles\Data.
At first we define the input string and create the corresponding input file.
The following lines address the different worksheets and read in the contained data.
Now we can create the GAMSWorkspace as usual and afterwards create a GAMSDatabase and fill it with the workbook data as follows:
Note that we can name sets and parameters just like in the database but we don't have to. Now we can run our GAMSJob as usual.
See also Transport10.java.
Create and use a save/restart file
Example: Transport11
In Transport11 we demonstrate how to create and use a save/restart file. Usually such a file should be supplied by an application provider but in this example we create one for demonstration purpose. Note that the restart is launched from a GAMSCheckpoint. From the main function we call the function CreateSaveRestart giving it the current working directory and the desired file name as arguments.
In function CreateSaveRestart create a workspace with the given working directory. Then we create a GAMSJob from a string. Note that the string given via baseModel contains the basic definitions of sets without giving them a content (that is what $onempty is used for). Afterwards we specify a GAMSOptions to only compile the job but do not execute it. Then we create a checkpoint cp that is initialized by the following run of the GAMSJob and stored in the file given as argument to the function, in our case tbase. This becomes possible because the addCheckpoint method accepts identifiers as well as file names as argument.
So what you should keep in mind before we return to further explanations of the main function is, that the file tbase is now in the current working directory and contains a checkpoint. Now in the main function we define some data using Java data structures as we already did in Transport4 before we create the GAMSWorkspace and a GAMSDatabase.
Afterwards we set up the GAMSDatabase like we already did in Transport4. Once this is done we run a GAMSJob using this data plus the checkpoint stored in file tbase.
Note that the string from which we create job t11 is different to the one used to prepare the checkpoint stored in tbase and is only responsible for reading in the data from the GAMSDatabase correctly. The entire model definition is delivered by the checkpoint cpBase which is equal to the one we saved in tbase.
See also Transport11.java.