Table of Contents
- What Is It?
- Installation
- Using STUDIO after Installation
- The Welcome and Explorer Windows
- Fixing Compilation Errors
- Ways to find and/or replace text strings
- Matching Parentheses
- Moving Blocks
- Syntax Coloring
- Other Editing Features
- Showing where a symbol appears
- Accessing Documentation Via the Help
- Making GDX files
- Examining GDX files
- Exporting GDX Symbols to EXCEL
- A difficulty you will have
- Command Line Parameters
- Default Command Line Parameters - yaml
- Solver Option Files
- Using Libraries
- Folding Code
- Bookmarks and accessing include files
- Code completion
- Using reference files - Listing and Unraveling Data items
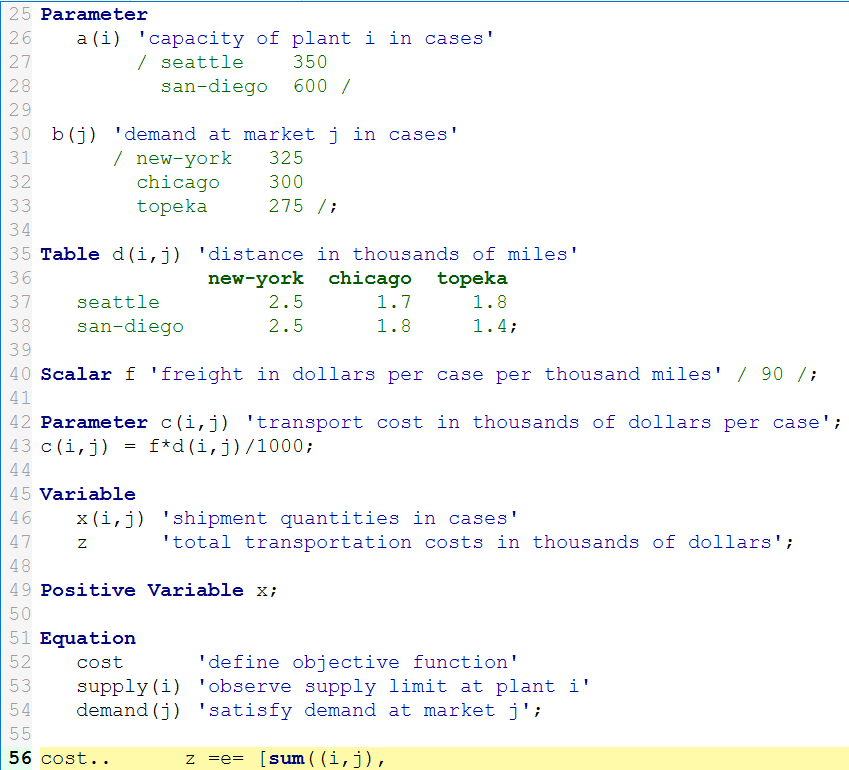
- Editing Solver Option Files
- Splitting the Screen
- Using the Debugger
- Working with Multiple Projects
- When is it Not Worth Using?
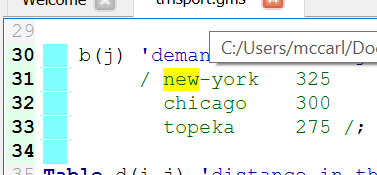
- What does it not do?
- What does it not do so well?
This tutorial on using GAMS Studio was written initially by and is distributed by courtesy of Bruce A. McCarl 1). Bruce has extensive experience with GAMS, both as a modeler and an educator, and many GAMS users know, use, and benefit from his work. This tutorial presents a guided tour to the usage of GAMS Studio and on some items it reflects Bruce's personal view and preferences.
What Is It?
A multi platform (PCs with Windows, Mac, LINUX) graphical interface to run GAMS
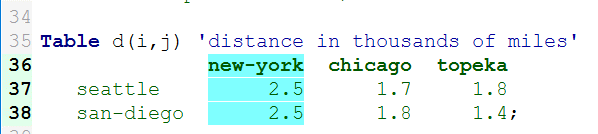
GAMS uses two phases.
Text edit
First, one uses a text editor and creates a file which contains GAMS instructions.
File submission
Second, one submits that file to GAMS which executes those instructions causing calculations to be done, solvers to be used and a solution file of the execution results to be created.
Approaches to use GAMS.
- More batch oriented traditional method use a text editor set up the model then use Windows (or LINUX) command line instructions to find errors in and run the model.
- GAMS STUDIO or GAMS IDE alternatives. Graphical interfaces to create, debug, text edit and run GAMS files.
Summary of steps to using
- Install GAMS and STUDIO on your computer

- Open STUDIO through the icon
- Create a project by going to the file selection in the upper left corner.
- Define a project name and location. Put it in a directory you want to use.
- Open or create a file by going to the file selection in the upper left corner.
- Prepare the file so you think it is ready for execution
- Run the file with GAMS by clicking the run button or pressing F9
- Open and navigate around the output
Installation
Install GAMS and STUDIO
GAMS STUDIO is automatically installed when GAMS is installed and set as primary editor. To install whole GAMS system including STUDIO do the following steps
- Download the GAMS installation file from www.gams.com under Resources and Download

- Start the installation
Installer should place an icon on the desktop yielding
Using STUDIO after Installation
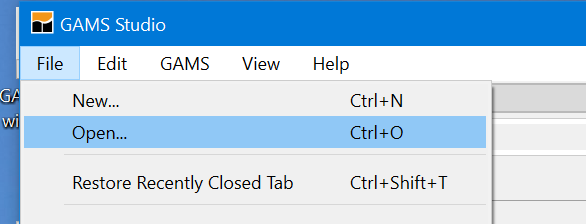
Open STUDIO through the icon
Open the File menu choice. Select a file.
Note, the file location determines where all generated files are placed (to place files elsewhere use the save as dialogue) and where GAMS looks for files when executing. I recommend that you make sure your file is in a place where you want it also making sure that place contains all associated files i.e. this is the file storage directory for this endeavor.
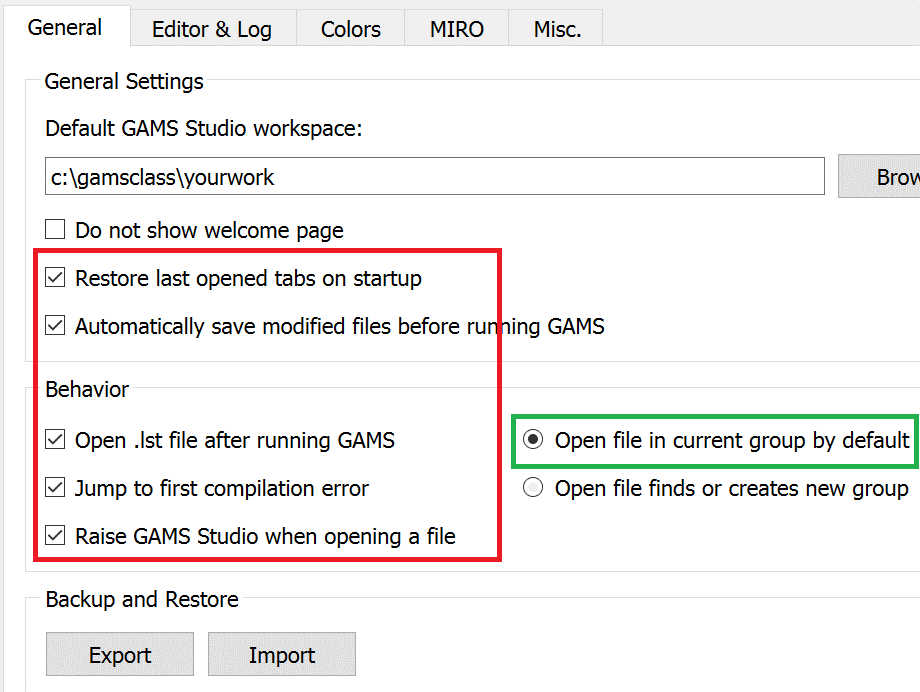
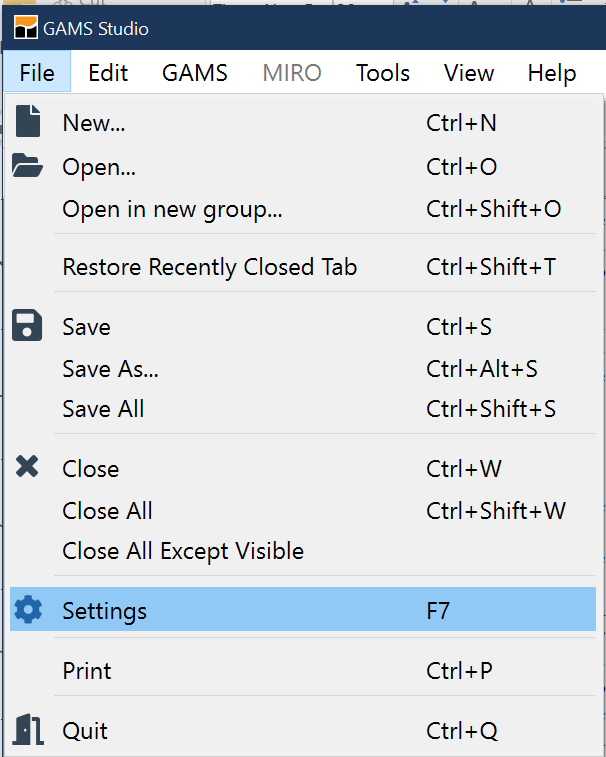
Fix defaults and suppress the highlighting of word under the cursor (I find it is very distracting). When first opening STUDIO go to settings and I would make sure check marks are as follows especially the checked ones in the red boxes and I would choose the green ones.

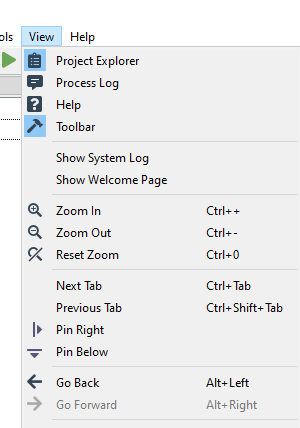
You should also select what windows that you want to see. Under view you can activate the explorer and process log.
Here selecting the Process Log and possibly the Explorer are of interest. Here selecting the process log window, toolbar and possibly the Explorer are of interest.
The Explorer will open automatically when a file is opened and the Process Log window will open when a solve is done. I usually hide the Explorer and sometimes want to get rid of the Process window.
You can also manipulate the syntax coloring being used in STUDIO. Go to settings and select COLORS and the window below will show up.
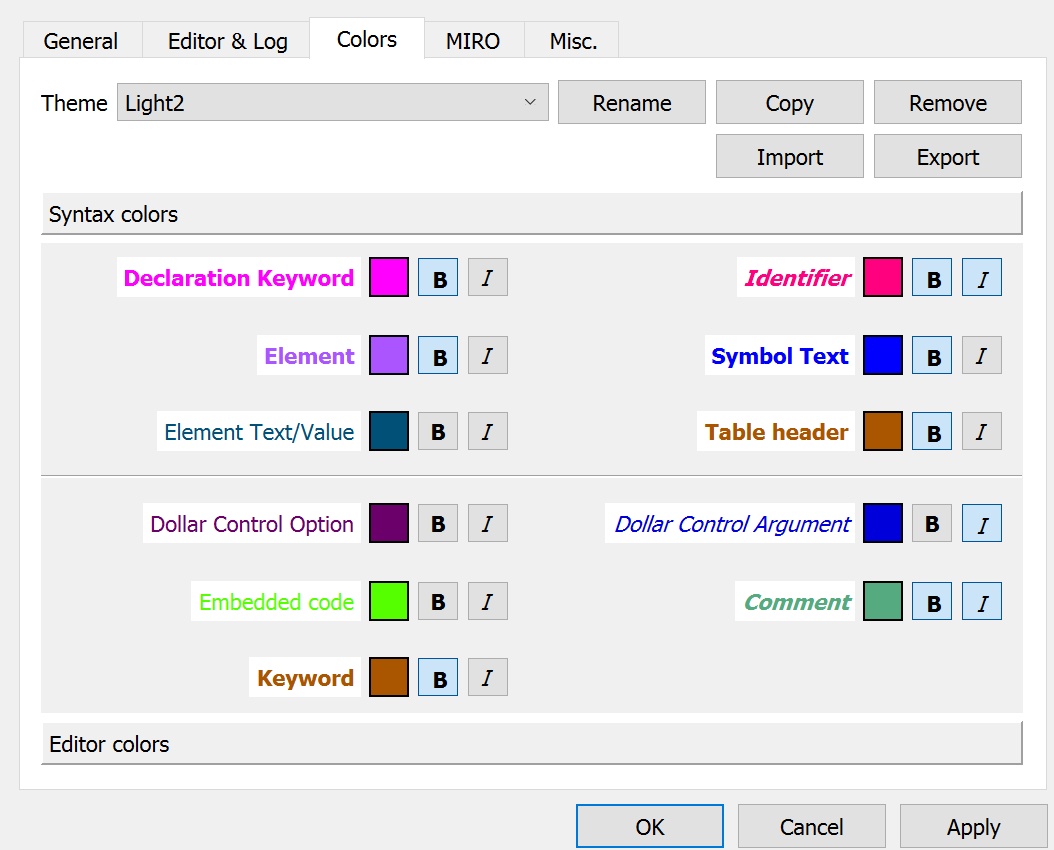
In turn you can manipulate the text coloring, bolding and italicizing in STUDIO for GAMS declaration keywords (set, parameter, Variables etc.), other keywords (set, solve etc), elements in sets, and other things.
I especially do this for comments as it shows me active and inactive code.
Getting Started
Create a project
Open the File menu choice. Select New Project and point to where you want it and give it a name (later you will use your previous projects).

What is a project? GAMS STUDIO employs a "Project" file for two purposes. First, the project location determines where all saved files are placed (to place files elsewhere use the save as dialogue) and where GAMS looks for files when executing. Second the project saves file names and program options associated with the effort. I recommend that you define a new project every time you wish to change the file storage directory.
Define a project name and location.
Put it in a directory you want to use. All files associated with this project will be saved in that directory.

In the "File name" area type in a name for the project file you wish to use. This defines the directory where for the most part the files you wish to access (those specified without full file path names) are located. If I was doing this, I might go to a suitable subdirectory and create a subdirectory called yourwork and put in the name myproject1. In turn, your project name will be called myproject1.gsp where gsp stands for GAMS STUDIO project. Often I will call this a name related to the model like refinery or farmmodel.
Create or open an existing GMS file
Several cases are possible
- Create a new file (covered later)
- Open an existing file - at first this will be in your project directory then you see something like
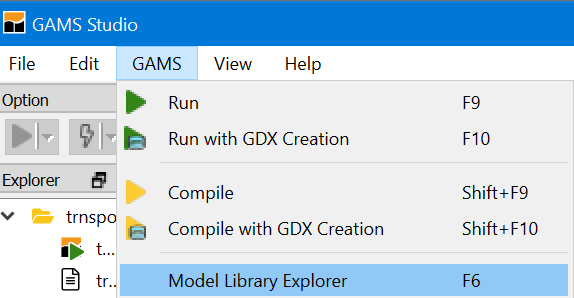
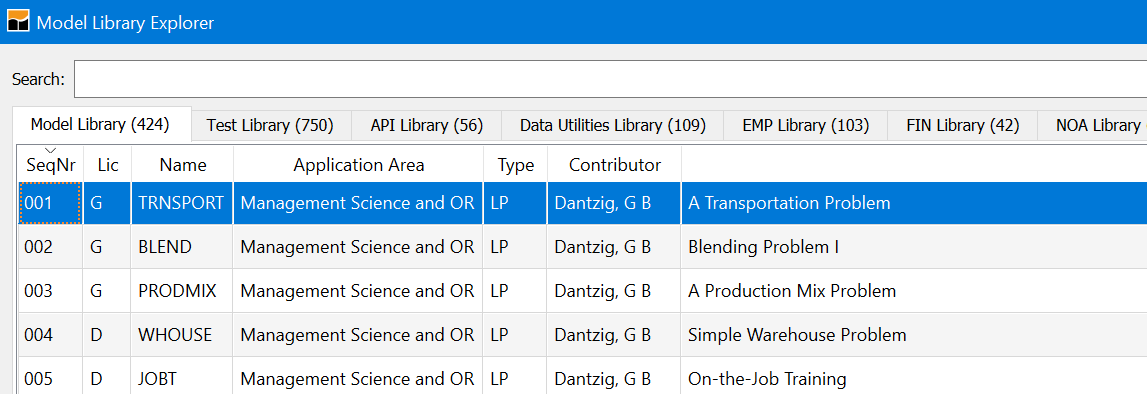
Open the GAMS model library explorer under the GAMS tab or press F6 (this is the simplest for first time users and the one we will use)
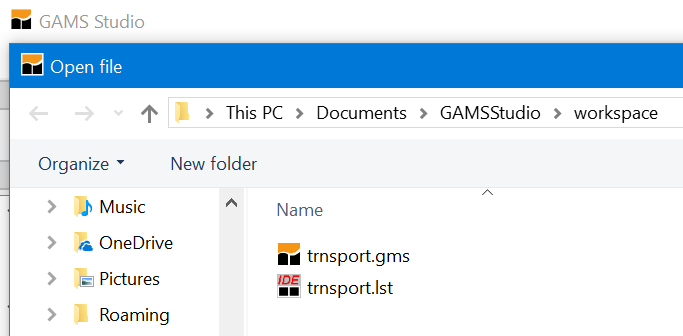
Select a model like trnsport.gms
It will be automatically saved in the last directory you used.
Prepare file for execution
When using model library trnsport.gms should now appear as part of your STUDIO screen.
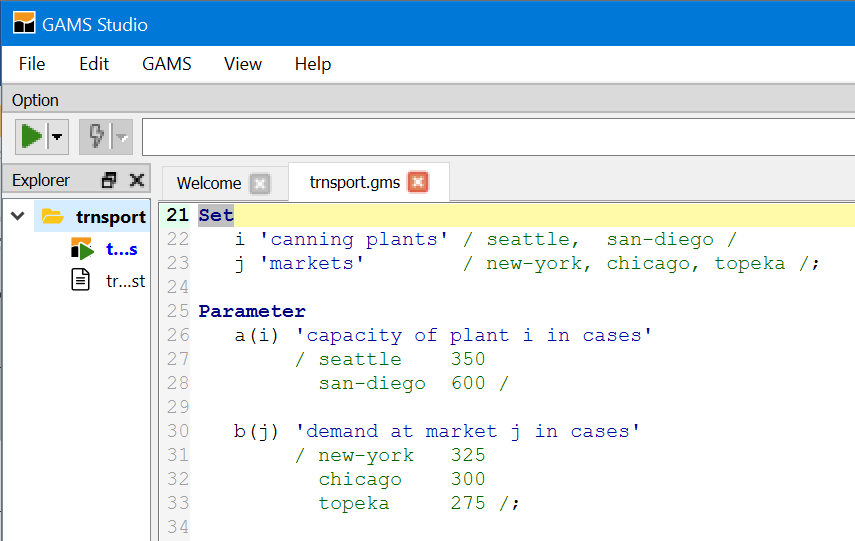
The STUDIO contains a full-featured editor. Go through the file and change what you want.
You can also customize the appearance somewhat through the settings choice under the File menu.
There you can change font size (under editor), tabs, default file location (called workspace) and some other features on how GAMS runs. For now leave it alone.
Make sure right file is executed
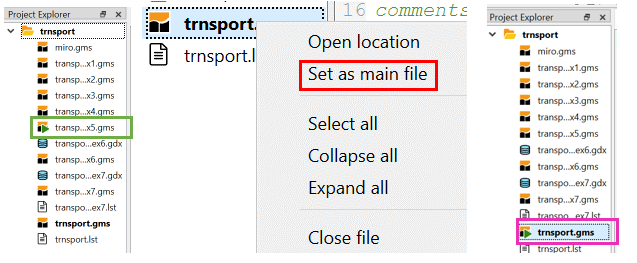
Unlike a lot of other programs, STUDIO does not necessarily execute the file you have been working on rather executing what it calls the "main" file.
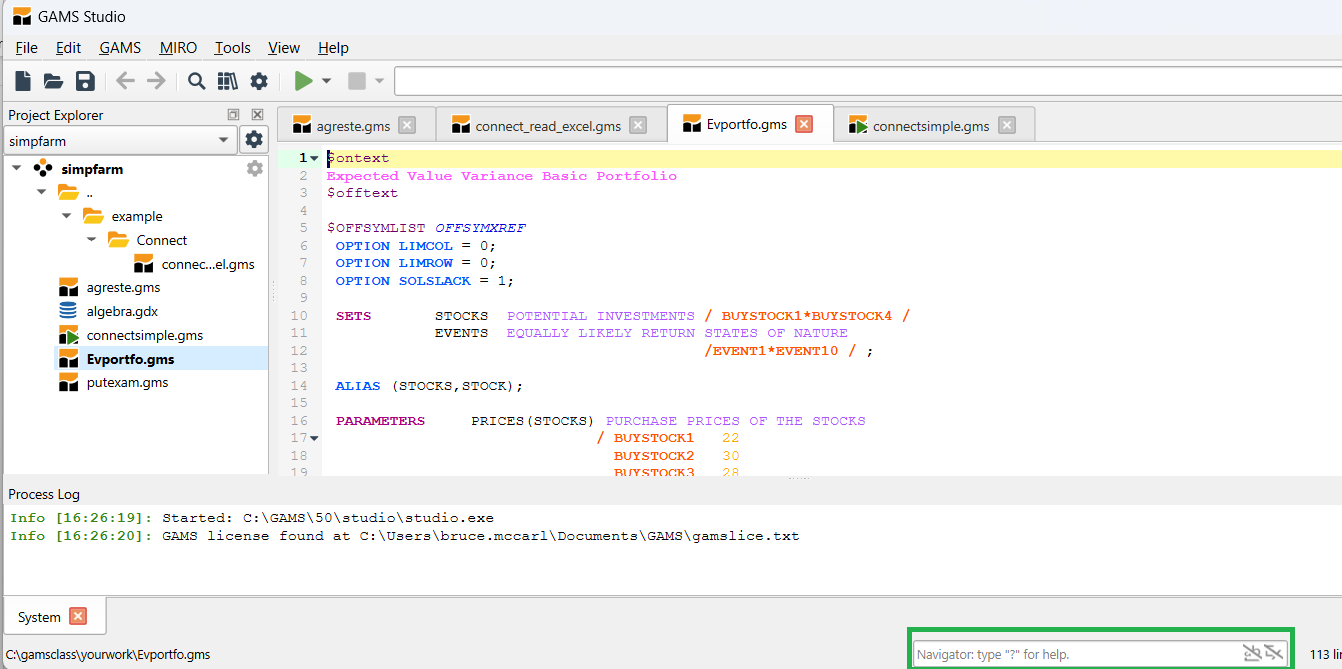
In particular, if you activate the explorer view then the main file is the one marked with a green triangle as below. This could have been defined when you set up the project or you can define it in the project explorer.
If the triangle is not marking the file to be run you need to right click on that file and then choose Set as main file. In turn the triangle will move.
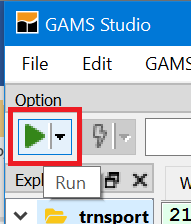
Run GAMS by clicking the run button
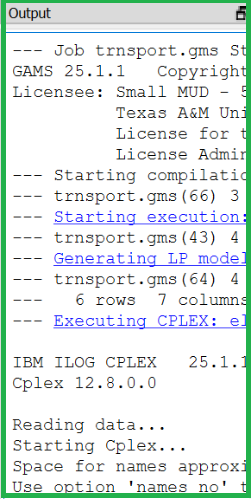
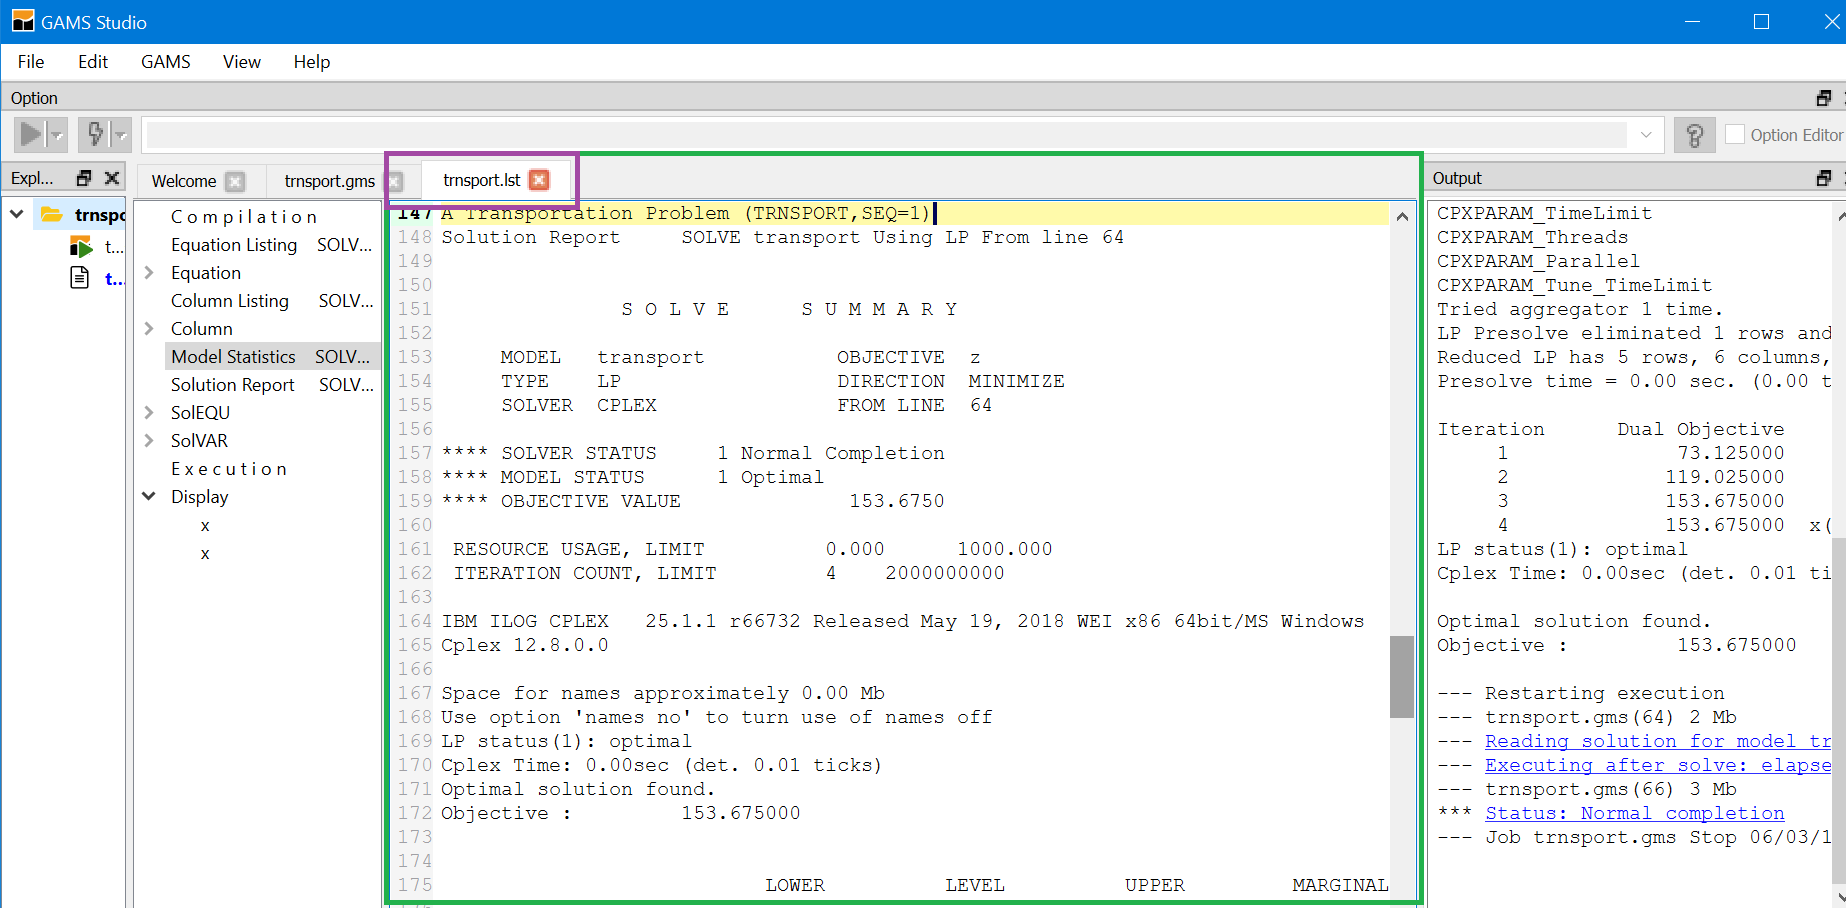
The Process Log window (green) will then appear which logs the steps executed in running the model. The LST file (red) and the navigation window (magenta) also appear. Note to save space I would close the Explorer window and drag the Process Log window (green) to the bottom or the right hand side. The process window on the bottom is illustrated here and it is on the right side on the following picture.
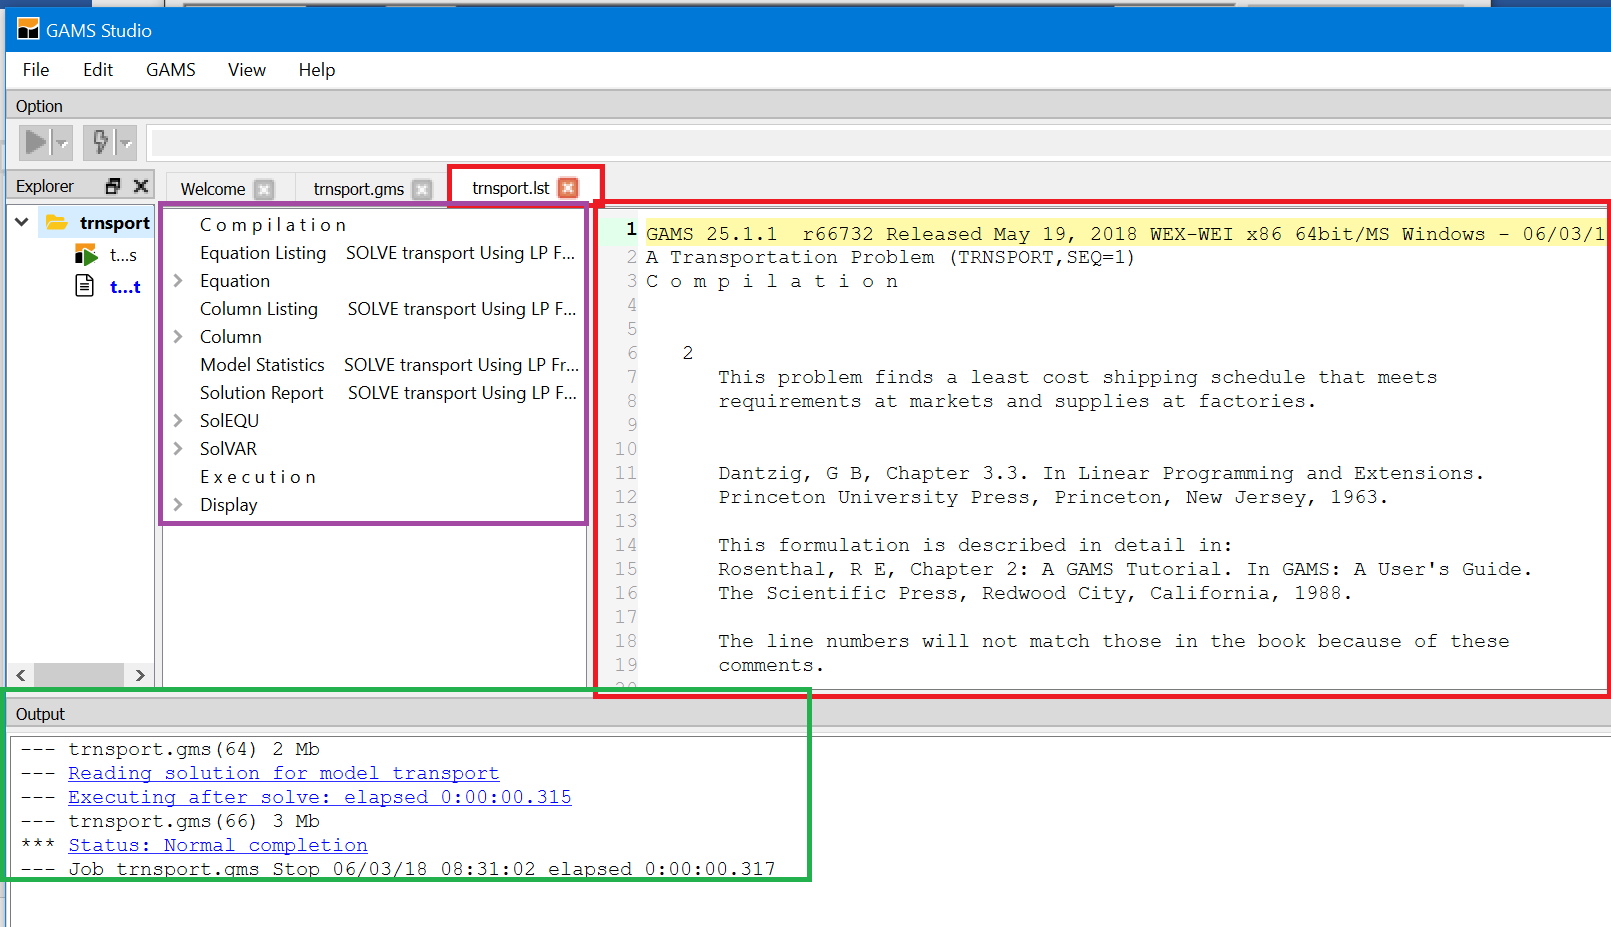
Here it is after reconfiguring by dragging the Process Log up and to the right then resizing and repositioning.
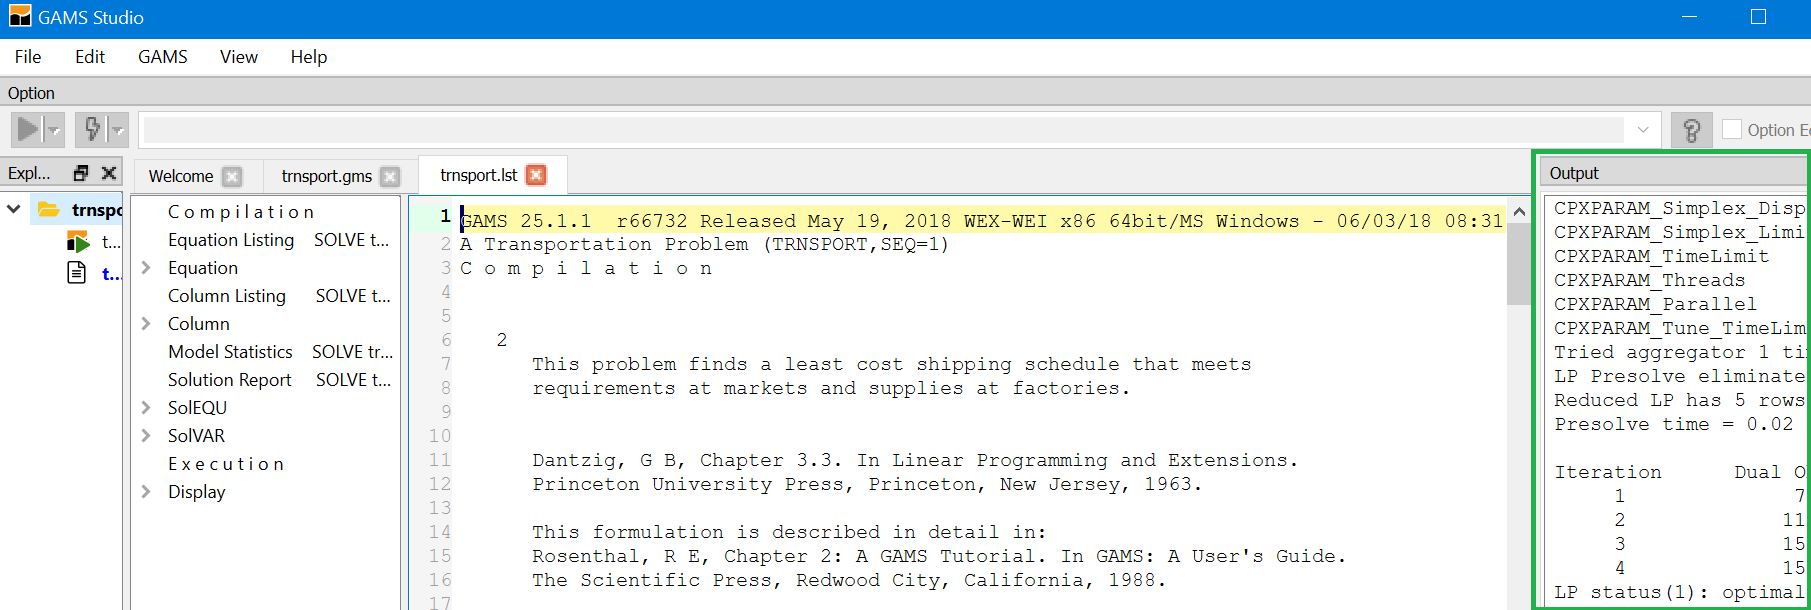
Now use the process window (green) to navigate the LST file or open created files. By double-clicking on lines in that window you access the LST file at particular locations or open created files. What and where you access is determined by the color of the line you click on.
| Color of Line | Function and Destination When Double-Clicked |
|---|---|
| Blue line | Opens LST file and jumps to corresponding place. |
| Non-bolded black line | Control click on this takes you to LST file. Double-click on error message takes you to spot in LST file. |
| Red line | Marks errors encountered. Cursor is positioned at first red line. When clicked on cursor jumps to Source (GMS) file location of error. Control click takes you to error location in LST file. Error description text is in execution process log and in LST file. You can use a little red icon in source to jump to error message in LST file or a green arrow in the LST to go to error location in source. |
| Green line | Causes studio to open a file that was created during the run like a GDX, PUT or REF file |
Navigate with process window
After double-clicking on any non-red line, or if we used the automatically open LST file option our main editing window is augmented by the LST file (green) (see the magenta tabs)
We can navigate as we would with an editor or word processor, as we are automatically in STUDIO text editor.
Sometimes I want to get the process window and explorer out of the way. I can do this through the view window and also through the icons (red) on the right side of the top bar

Clicking on these opens and closes the explorer and the process window.
Navigate with LXI window
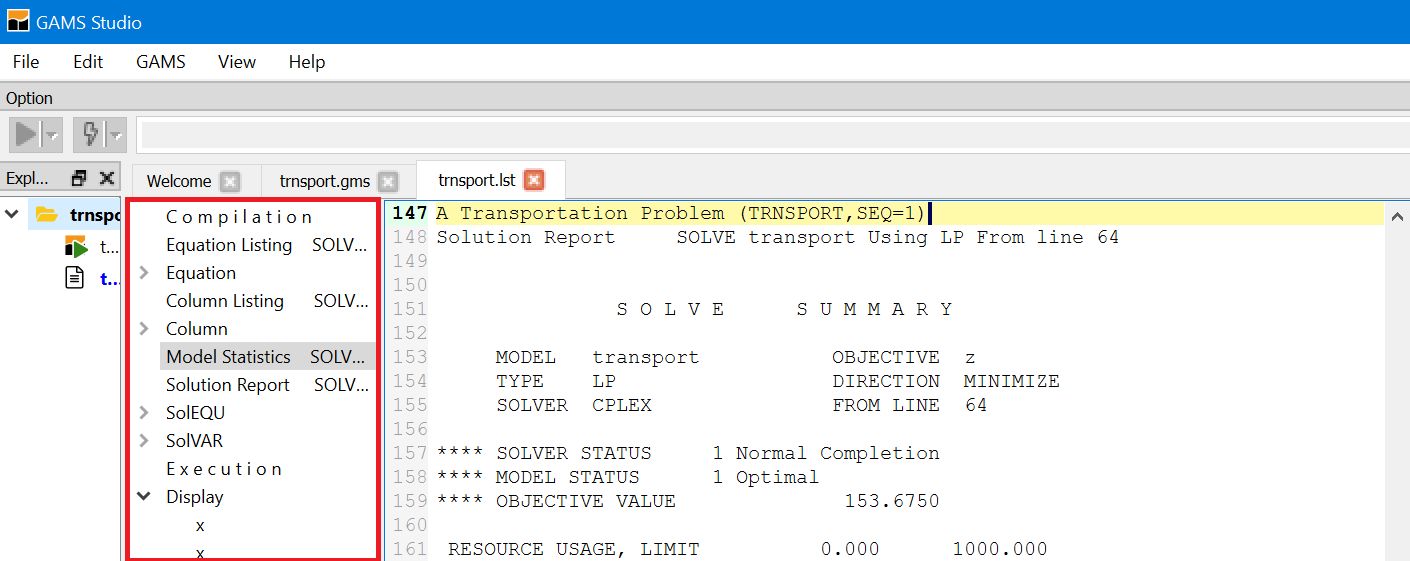
| Navig. Line | Function and Destination When Clicked. |
|---|---|
| Compilation | Jumps to top of echo print in LST file |
| Error Mess. | Jumps to list of error messages when errors present |
| Equat. listing | Jumps to list of equation contents |
| Equation | Expandable allowing jump list of equation contents |
| Variab. listing | Jumps to list of variable |
| Variable | Expandable allowing jump to list of variable contents |
| Model stat. | Jumps to model statistics part of LST file |
| Solut.Report | Jumps to model summary solution report |
| SolEQU | Expandable allowing jump solution for each equation |
| SolVAR | Expandable allowing jump to solution for variable |
| Execution | Jumps to beginning of post solve execution |
| Display | Jump to displays of specific parameters and other items |
Working with your own files
Now you are ready to work with your own files. You may already have a file or you may need to create one.
Creating a new file - Two principal ways
- Open an existing file through the library or from your hard disk. Then use the save as dialogue in file menu to change its name. Now modify contents. You may cut and paste as in other programs.
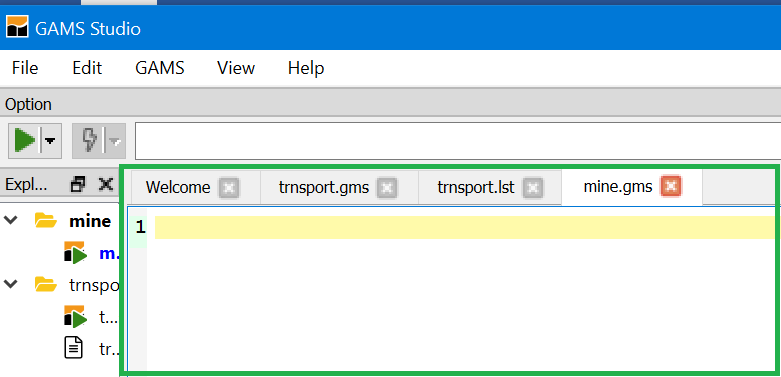
Open the file menu and use the new option. You will then be prompted for a name (I called it mine) with the extension .gms and then have a blank screen (green) into which you may type GAMS instructions
Save that file wherever you want and reopen it that will become the new default directory (this only occurs upon an open not a save as) and any subsequent non library opens, simple includes or saves will go there. Imports from the library go to the default workspace. You likely will need to make this the main file.
The Welcome and Explorer Windows
STUDIO can show a "Welcome" window (activated under the View menu) that remembers previous files plus gives access to documentation.

There as of now you get links to files recently used, and links to some documentation.
Also on the left hand side is an Explorer window that shows recent files and allows you to open by double-clicking. This remains whether you are in the welcome page or editing files unless it is not checked in the View dialogue.
Fixing Compilation Errors
No one is perfect, errors always occur. The STUDIO can help you in finding and fixing those errors.
Let's look at an example with a small typo to illustrate (note: source vs. sorce). A run yields the windows below where the right part is the process window (green) positioned to show the first error and the center is the lst file (magenta) positioned to show the first error.
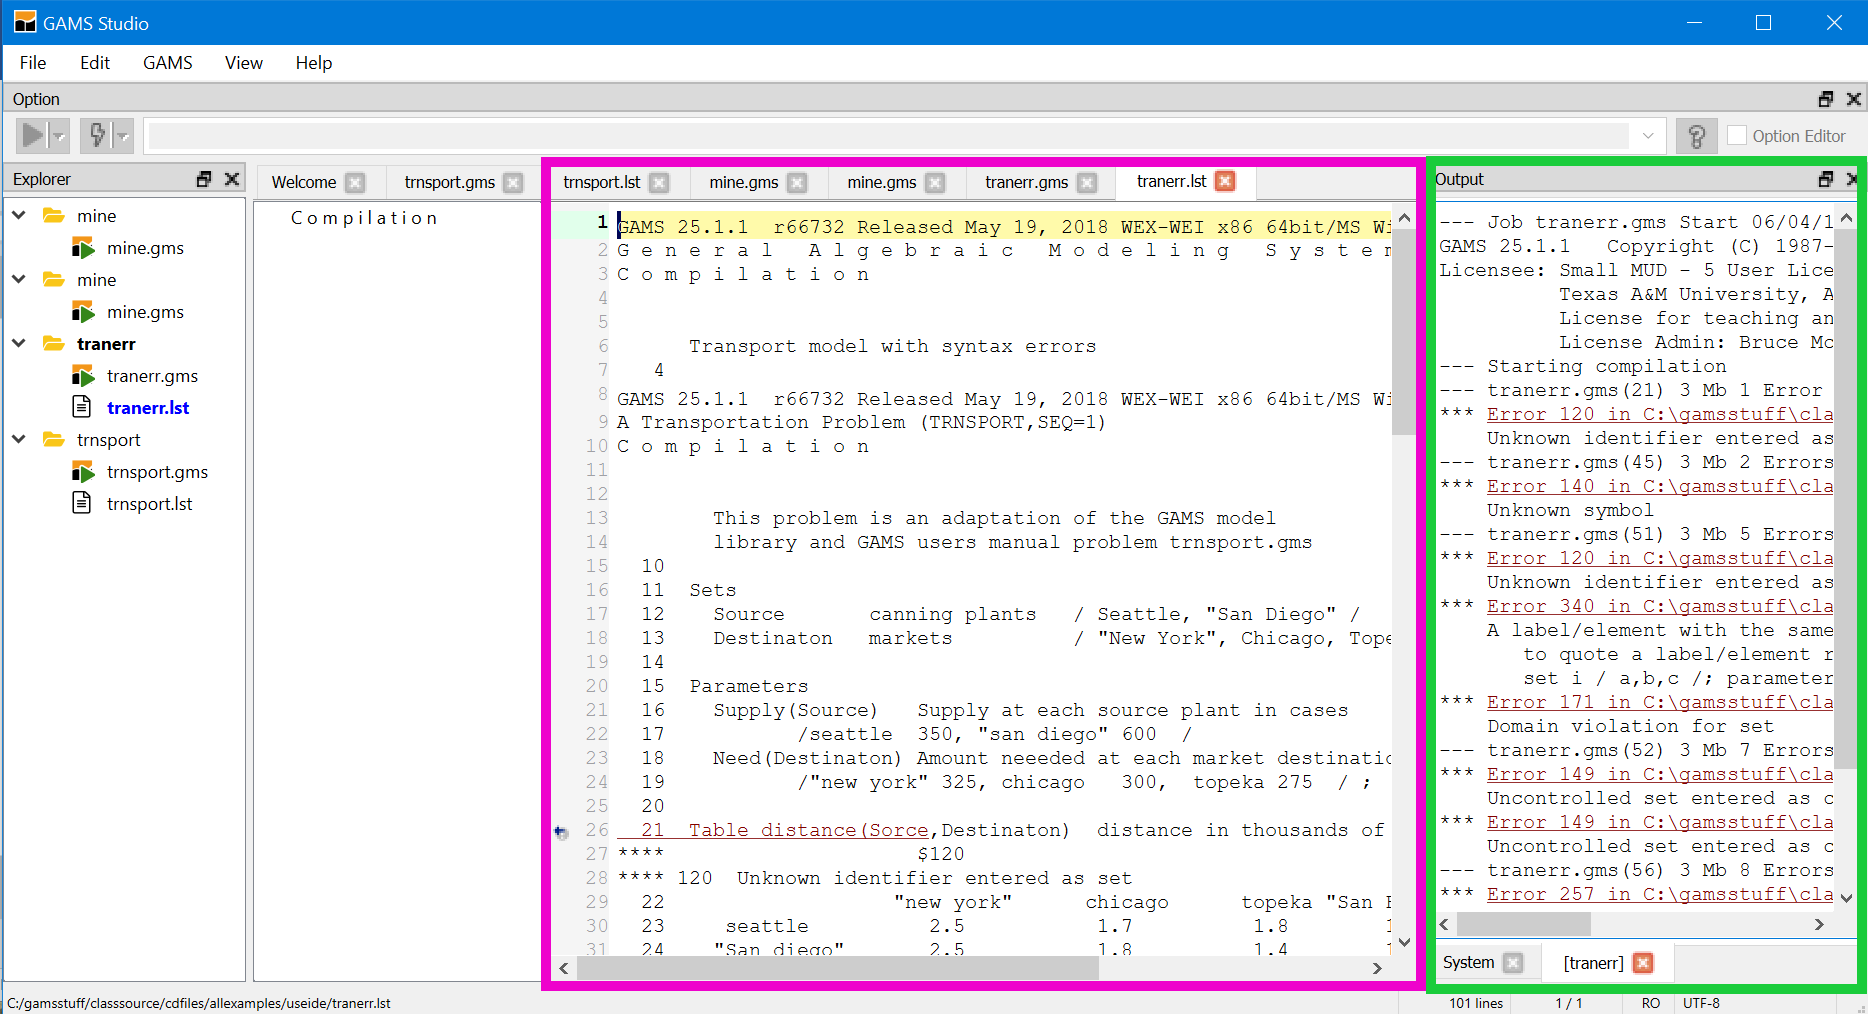
The red lines in the process window mark errors with error messages just below. To see where the errors occurred click on the very first red line which opens the source file or click on the black error message line just below the red error marking line to look at the LST file where the error appears and the exact placement will be marked with a $.
A click on the red line takes you to the place in the source where the error was made. The tip here is always start at the top of the process file when doing this and STUDIO now starts there.
A double-click on a black line takes you to the error location in the LST file.
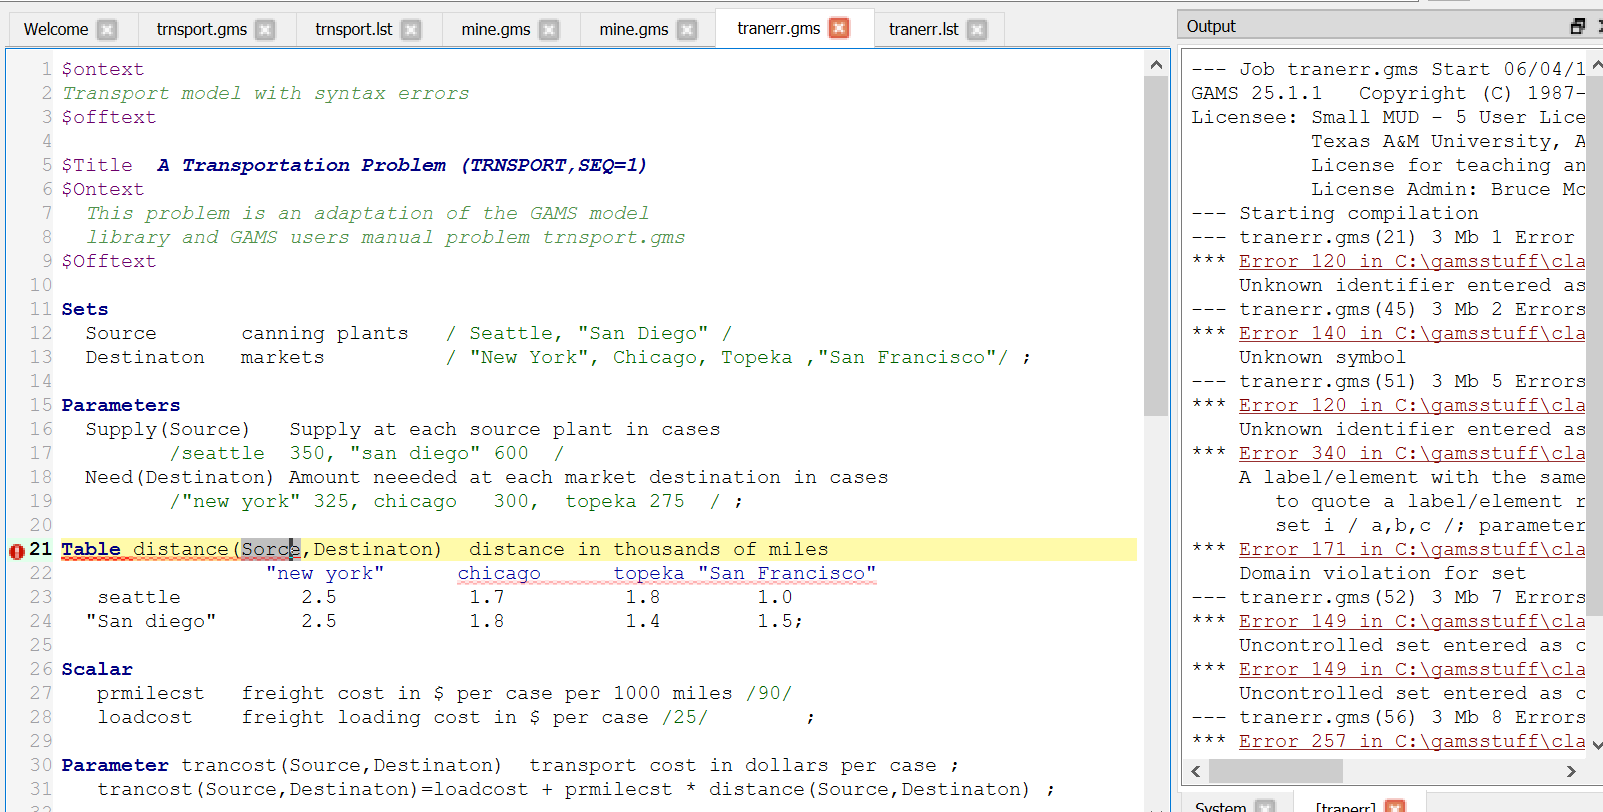
Also in the source file window note the small red circle that appears on the line with the error

Clicking on that transfers you to the LST file where the error message appears.

And there a small gray circle with an arrow in it that when clicked on will transfer you back to the source file
Ways to find and/or replace text strings
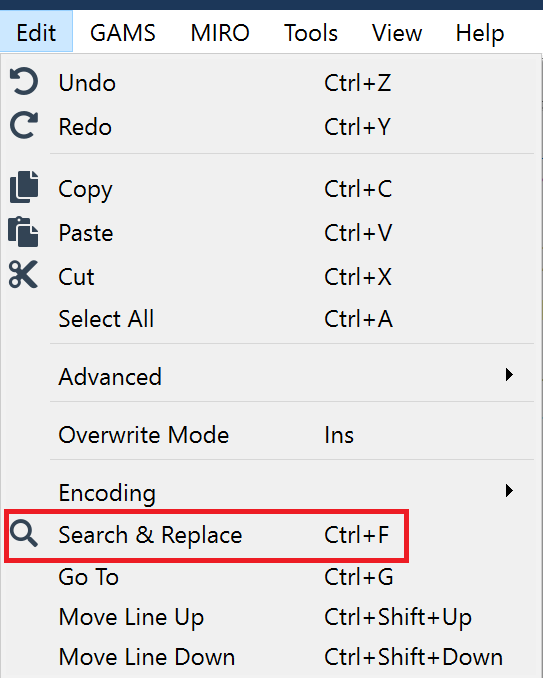
For finding you can use the search menu under the Edit tab or control F
Subsequently, you get
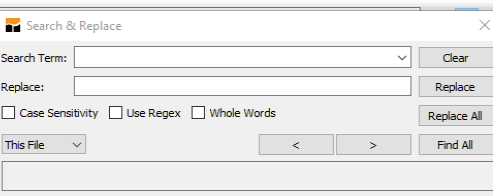
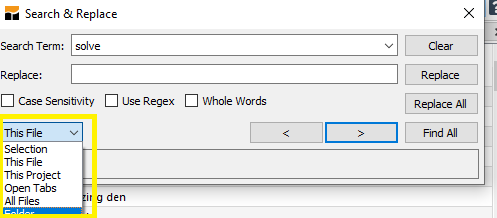
Which allows both search and replace. As of now this opens with the last option you used and may start with initially with an all files setting.
Note last year they added a find in a named directory (they call it folder).
After the search you find
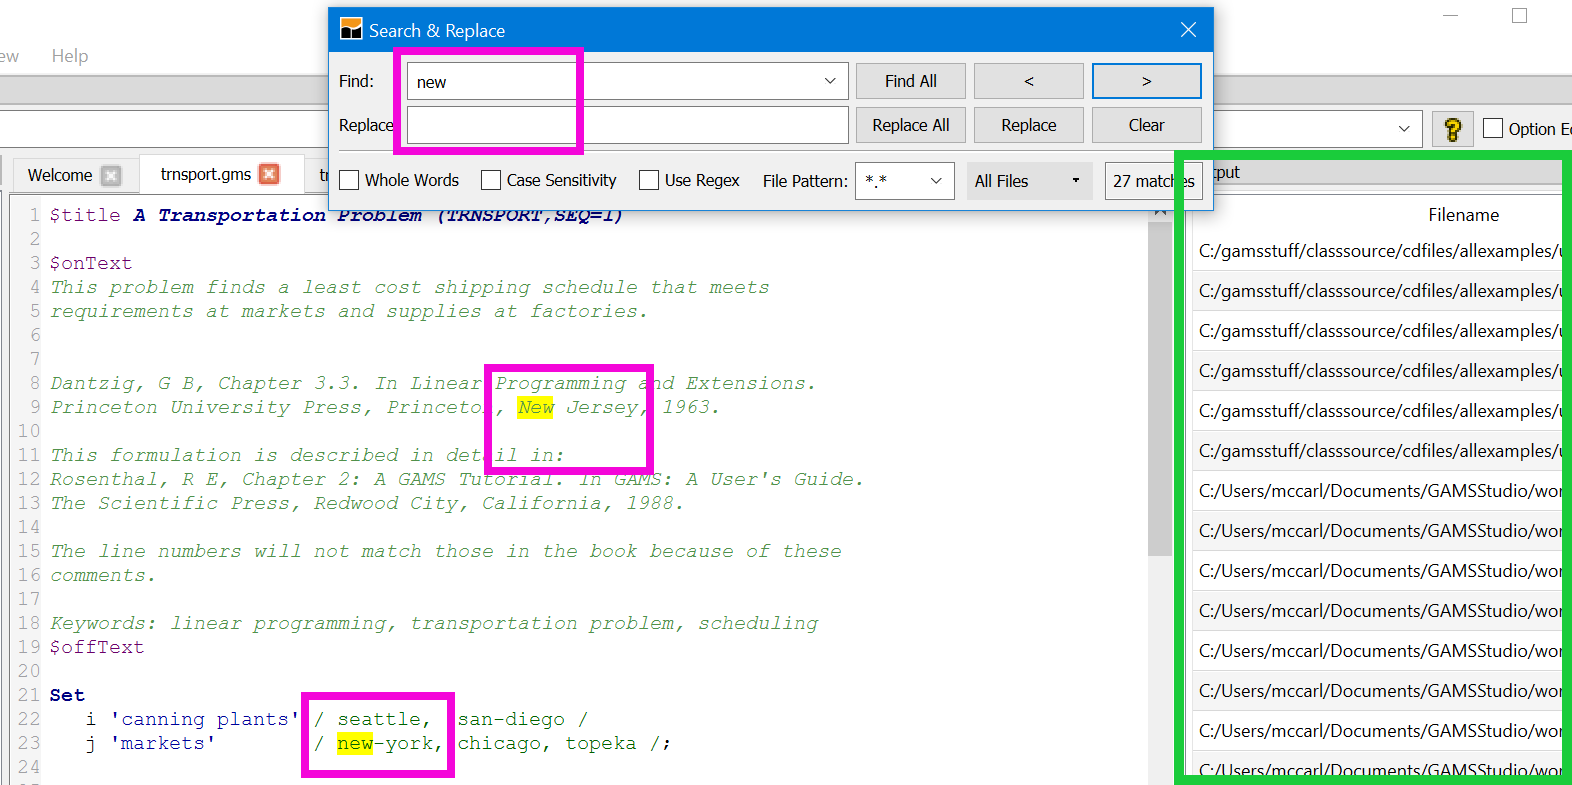
Where all occurrences of the search term in the current file are highlighted and to the right there is a list of all files that contain that search term (green) in all of the files opened in the explorer or in the specified folder.
The search dialogue is straight forward with arrow keys to jump to next (F3 also works for forward and shift F3 for backward) and the and the place to search can be manipulated as shown. (in yellow).
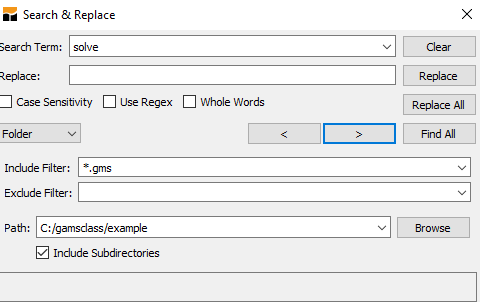
After saying search in folders then the dialogue has you specify
- a mask identifying files to search/replace within
- possible files to not search within
- a directory location
- a use subdirectories possibility
- the string to find
Where if you select find all then as shown above all occurrences of the search term in the current file are highlighted and to the right there is a list of all files and line numbers that contain that search term.
Matching Parentheses
STUDIO provides you with a way of checking on how the parentheses match up in your GAMS code. This involves positioning your cursor just before an open parentheses or just after a close (Just after also works if there are not multiple parentheses). In either case the corresponding close or open is highlighted in green. Additionally positioning the cursor right before the beginning parentheses and tapping Ctrl + b will lead you to the matching ending parentheses whether it be 1, 100, or 1000+ lines away and vice versa.

When the expression in parentheses carries on the several lines the marking is in multiple lines and Ctrl + b will transfer position back and forth

This feature will also match up { } or [ ] with a red marking if the types don't match.
Moving Blocks
The STUDIO allows one to move text blocks through standard Cut and Paste Operations in two fashions.
- One can identify a continuous block of text with the mouse or the keyboard (the latter involves putting the cursor at a beginning point then hold the shift key down and use the arrow keys).
- One can identify a column block of text (blue) with the mouse or the keyboard (these involve holding alt and shift down then moving the mouse or the cursor with the arrow keys.
In turn copy, cut, and paste can be done with the Edit menu or with control c, x and v respectively as in normal windows. Control insert also pastes.
Also if one types with a column block highlighted than the character goes in all rows of the block and replaces what was there before
with an * typed becomes
Syntax Coloring
A feature in the STUDIO is syntax coloring. The STUDIO recognizes a subset of the GAMS syntax and reflects this in the display colors. Note in the display below that commands, explanatory text and set elements are differentially colored.
Other Editing Features
Under editing you get a few other choices that merit comment.
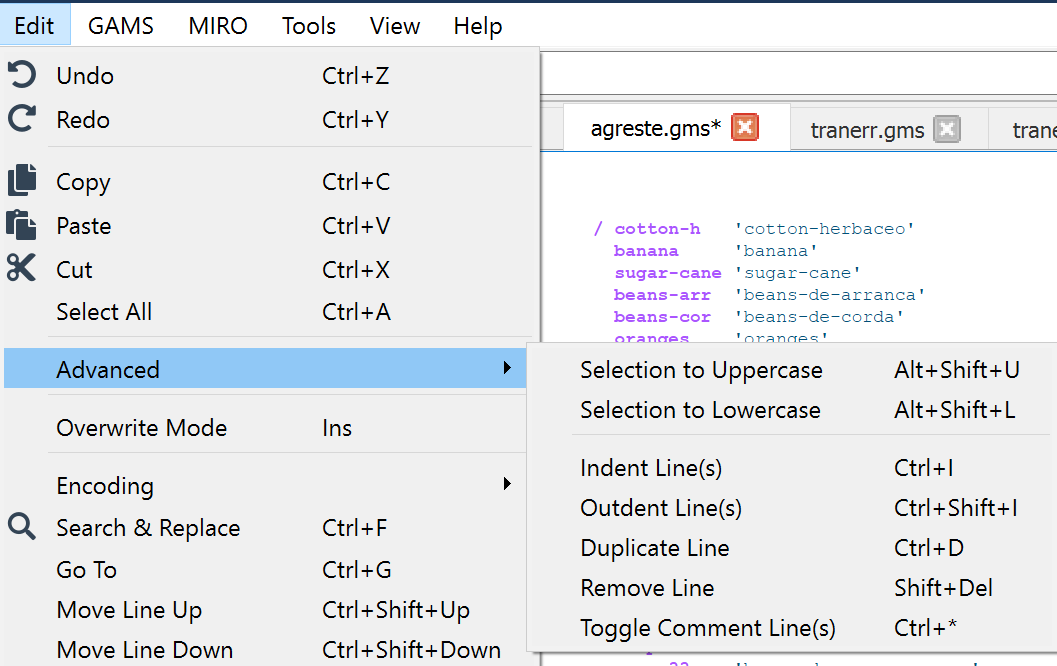
At the bottom of the edit you can see features to move lines up and down while under Advanced you can toggle case, add or remove indenting and convert a selected set of lines to or from comments. On the latter highlighting some code and typing Ctrl + Shift + asterisk adds * to every line in column 1. Also you can reverse this or remove elsewhere by highlighting a block and pressing the same key sequence.
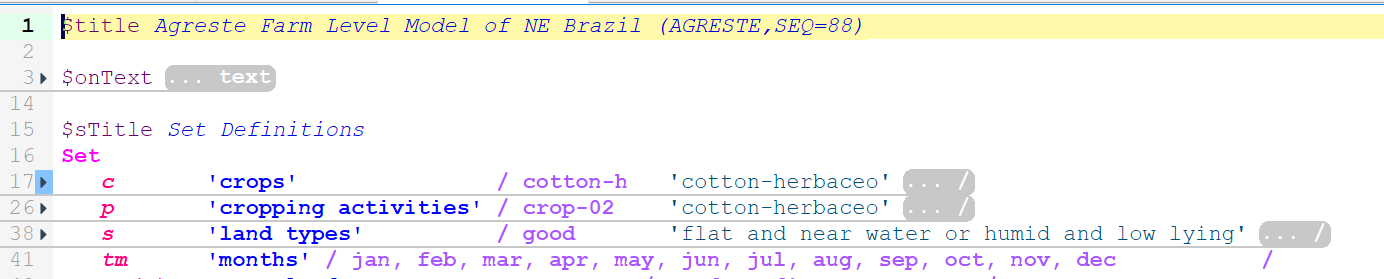
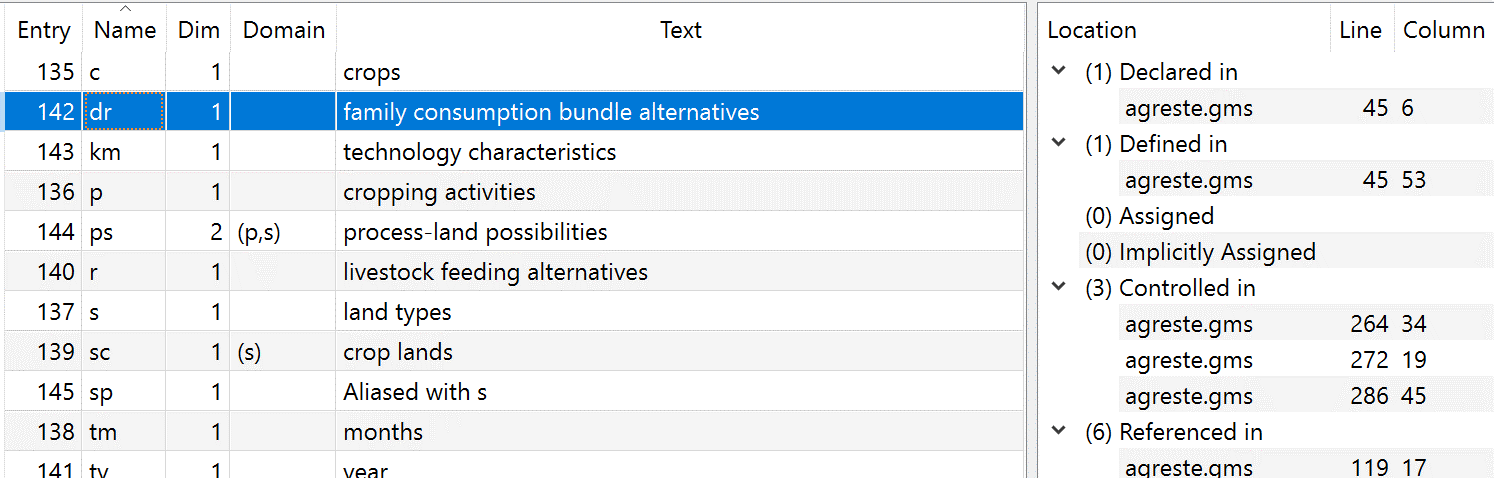
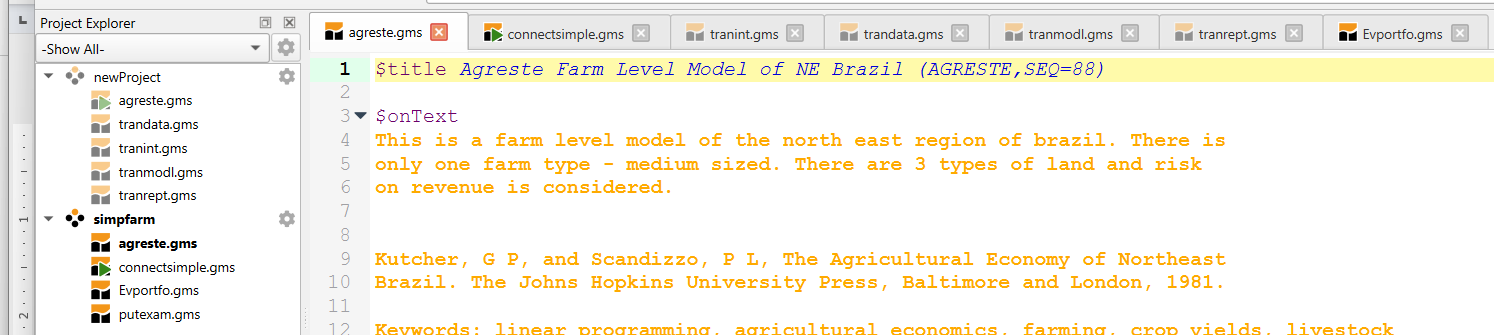
Showing where a symbol appears
Studio has a feature that identifies where a symbol is used. Taking the library file agreste.gms and positioning the cursor over a symbol like c (blue) then double-clicking places a (gray) highlight over all visible instances of that symbol

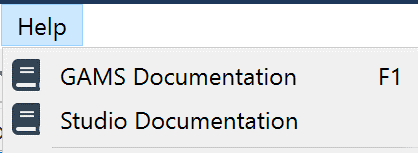
Accessing Documentation Via the Help
To access GAMS documentation choose help or F1
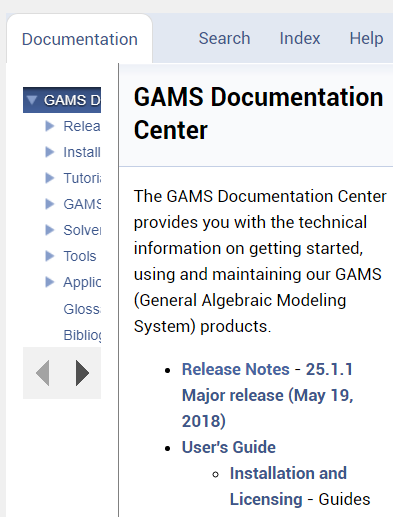
And if you choose documentation you get access through a window in lower right corner as shown. Therein you can navigate, search, and look at the index.
If your cursor is on a reserved word in the source file and you press F1 an index opens to all treatments of that word although in some strange places.
There is a document that explains features in the STUDIO and a YouTube video that can be accessed through the Welcome page or in the general GAMS documentation under Tools.
Making GDX files
STUDIO can create and show GDX files. To create in STUDIO use the GAMS tab and choose a GDX creating choice. Alternatively use one of the other ways in the language as we will discuss elsewhere.
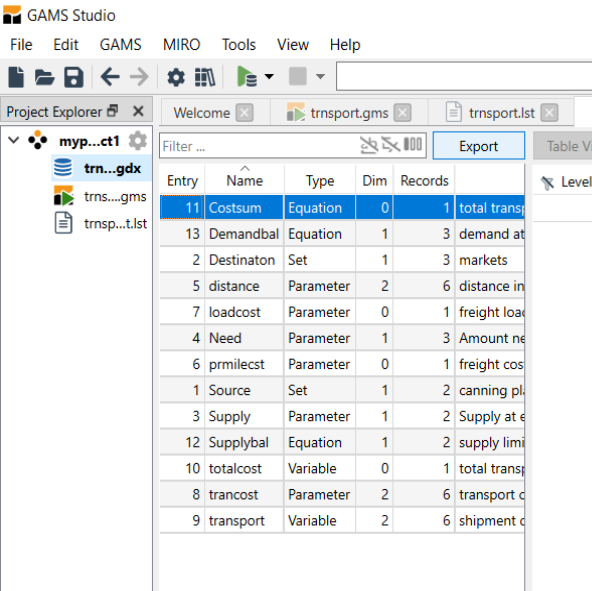
To browse a GDX file open it with the file open dialogue or click on green lines for ones created during a run in the process window and then for the transport example
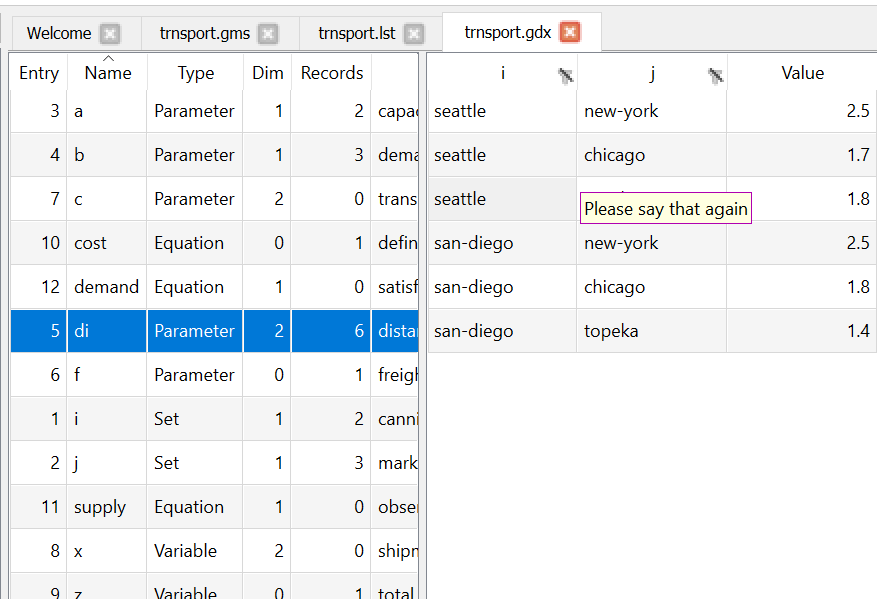
Here in the left-hand panel one gets an alphabetical listing of the items in the GDX file and their characteristics. Then clicking on a left-hand panel item leads to the item contents being revealed in the right hand panel. As of now you can reorder columns and filter values then in table mode. With 3 plus dimensional items in table mode you can move things in rows into columns and vice versa.
Examining GDX files
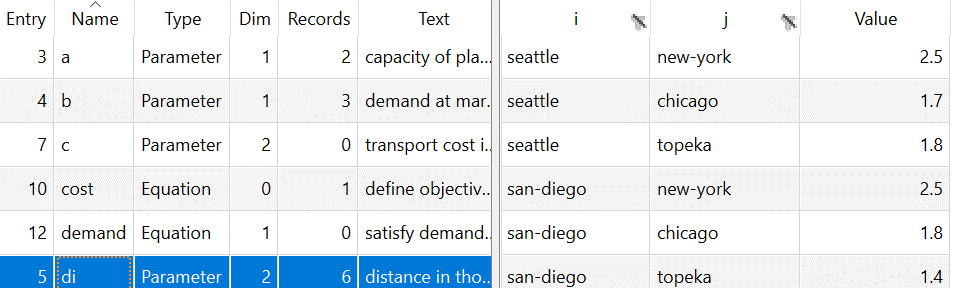
When you have opened a GDX file and selected an item then you get a window like that on the previous page
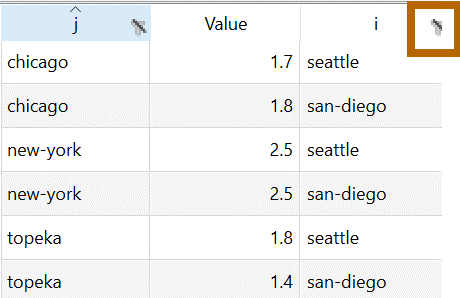
If in the right-hand panel you dragged i to the right of value (brown below) you get
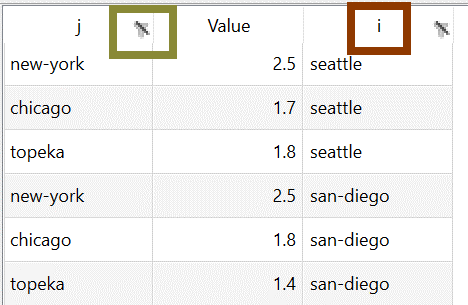
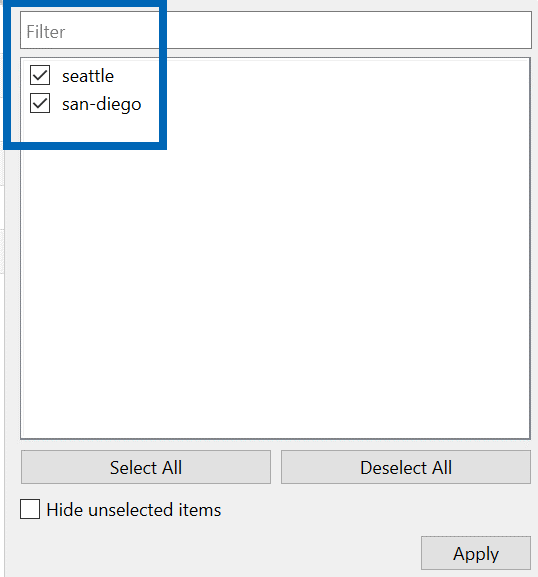
Also by clicking on the header you cause the array to be sorted with a ^ marking the sort order and by clicking on

you can establish a filter (green above and brown below) that limits elements displayed (blue below).
Exporting GDX Symbols to EXCEL
When you have opened a GDX file you get a window like the following that has an Export button:
And that brings up the following export dialogue:
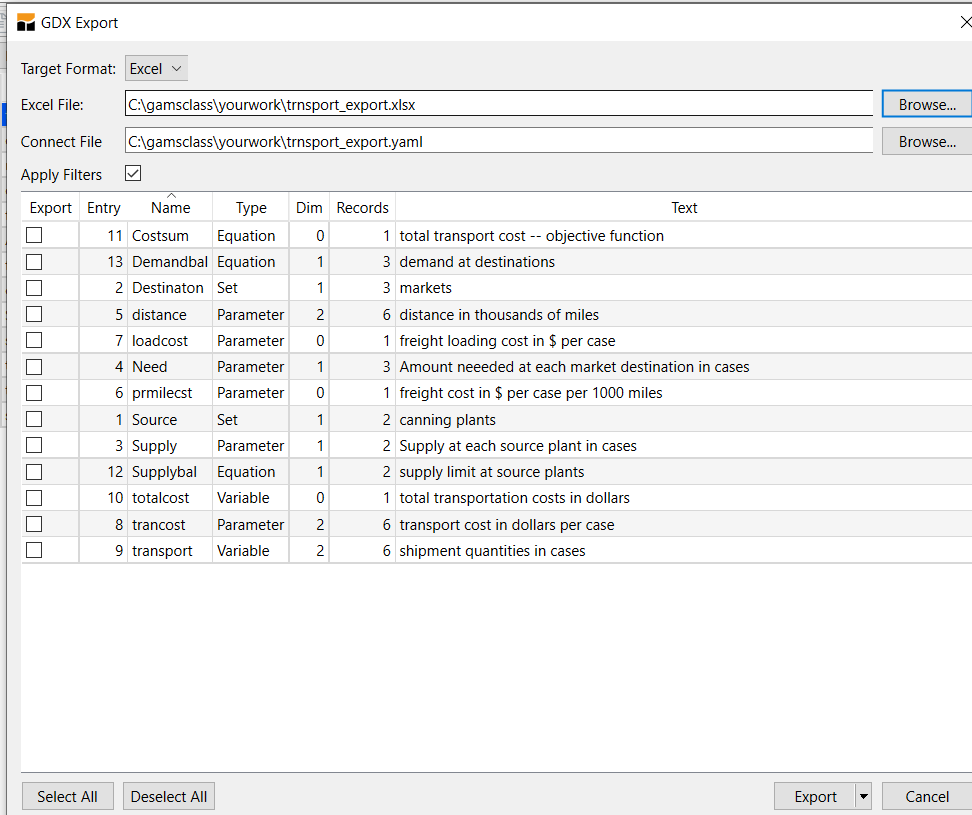
You then select the destination spreadsheet, a file where instructions are passed on where to put things in the spreadsheet, and check boxes to select what symbols you want to export. Then clicking on Export causes the workbook to be written. As of now this overwrites the workbook if it exists. That workbook contains a sheet for each symbol written.
A difficulty you will have
When using and teaching both the IDE and STUDIO, I find that file locations sometimes gives me fits. I have a rule of thumb to avoid problems, but you will most likely inadvertently not follow it.
When working with a model with multiple files make sure they are located in the same directory location.
You do not have to follow this rule, but deviations are the same as asking for trouble. When you are actively working on a file that you have opened from a directory then STUDIO will look for files in the directory where active file is located.
Also when you run a file which contains includes GAMS will look in the directory where the active file is located.
Command Line Parameters
Experienced Windows or UNIX based GAMS users are used to having command line parameters associated with their GAMS execution commands. In STUDIO a command line parameter entry box (magenta) is available just to the right of the execute button. The parameters are associated with a file and STUDIO will remember these whenever the file is opened.
This is particularly useful for save, restart, limrow, limcol, pw and rf parameters as once they are defined they are associated with every subsequent use of the file.
As of now you can also provide command line parameters for use in every run (like a wide page width) through the yaml file as discussed below.
Default Command Line Parameters - yaml
There are cases when you would want to supply parameters to all jobs that you run. This can be done by manipulating the yaml file.
In particular if you go into the GAMS menu choice under default configuration
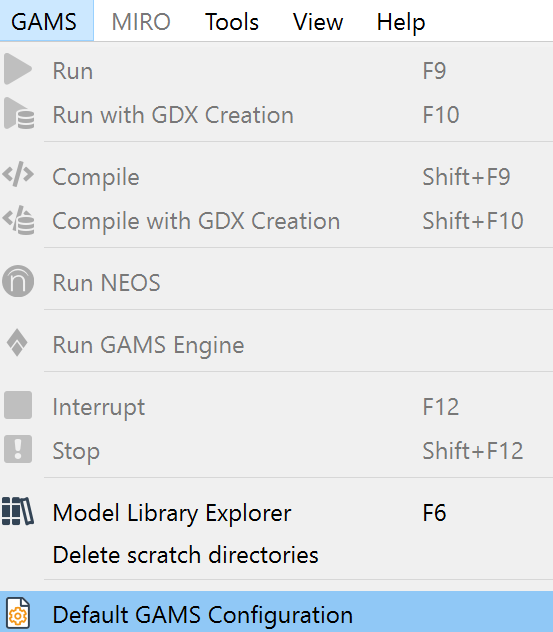
you get something like

Where the default values appear on the left and you can select parameters to provide default values for in the right box. Note these choices are overridden if you enter things in the command line box as described above.
GAMS provides assistance with command line parameters through the command line parameter editor. To activate it check the

symbol at the far right (red) up top. Then part of the screen becomes as below. In the left hand part existing command line parameters (purple) in use (magenta) are listed along with their values. On the right all possible command line parameters are listed with definitions (green) and a search dialogue is provided (blue).

The search dialogue looks for text in any of the fields, thus typing in wid brings up page width as does pw and maxi brings up those with maximum in the description.
Note pressing F1 while the cursor is on a command line entry opens help to a place with a detailed description of that parameter.
Solver Option Files
STUDIO allows you to edit or create a solver option file. When using the solver Conopt you create conopt.opt or with Cplex use cplex.opt (or .op1 or .o10 or .111) and more generally solvername.opt. Specifying such a file allows you to manipulate the way the solver works on the model. For example, you can alter scaling, tolerances, iteration limits, solver algorithm, and branch and bound strategy along with many other things.
In Studio the option file editor is accessed by either
- Right-clicking on the group name (red) for a group where you want an option file then choosing add new solver option file (blue) and picking the appropriate solver name (magenta)
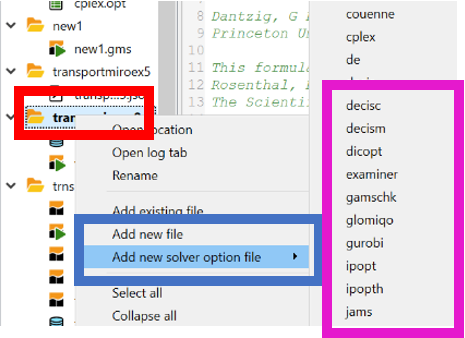
- Creating a file like
baron.optthen when you bring that up in the editor the option file editor appears. In the editor you see options in use (blue), possibilities and definitions (red)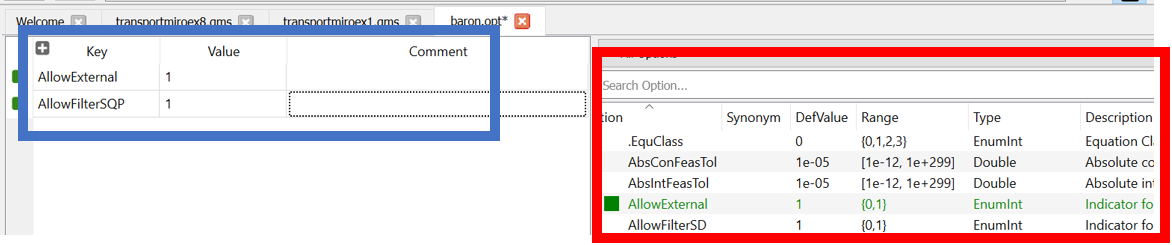
Using Libraries
STUDIO allows one to access libraries under the GAMS menu item and choosing the Model Library Explorer (purple).
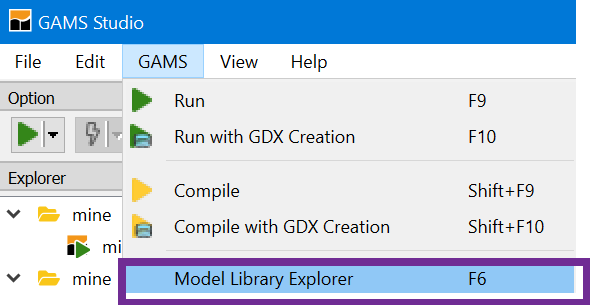
In turn this opens a screen which identifies names of the libraries in tabs with a count of included files and, for the tab selected, the library contents. Furthermore across the top are tabs that when clicked on cause sorts. The picture below came after I clicked on the tab name with the model library active

Users can define their own libraries. They have to define what's called a GLB file and the formatting creation of this is discussed in my newsletter in the second issue: https://www.gams.com/mccarl/newsletter/news2.htm.
Folding Code
STUDIO allows one mark or otherwise select code to hide when in the editor in a procedure called folding. This does not remove that code from the GMS file but just hides it from view in the STUDIO editor.
Several kinds of code are folded including
- code between matching parentheses across multiple lines
- code between
$ontextand$offtext,$onfoldand$offfold,$onputand$offput,$ifthenand$endif
- Code in multiple line definitions of sets, items surrounded by parentheses, things in multiple line loops, ifs and others.
Markers are inserted to indicate folded code. One to the right of the line numbers and another in the first line of the folded block.
To toggle folding state of a section either the fold-marker by the line numbers can be clicked or the shortcut key Alt + L when cursor is on a foldable line. All folds are activated or deactivated using View menu or Alt + O and Alt + Shift + O.
Bookmarks and accessing include files
STUDIO allows you to add bookmarks in the code then access them under view and bookmarks.
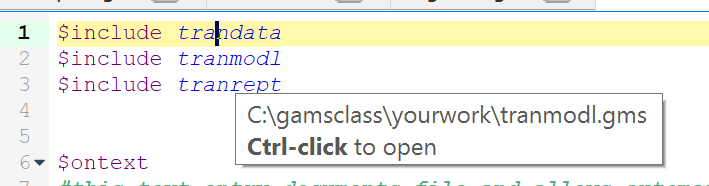
Studio also allows you to automatically open files referenced by include statements.
To do this you hover over a file name in an include statement and then type control click as prompted.
Code completion
STUDIO offers completion for keywords known by the compiler.
The code completer is active by default and shows keywords that matches the current syntax and starts with the already typed characters of the word to the left of the cursor. Below I started typing lo and the completer showed up with choices:

The selected word can be inserted with the keys tab or enter/return or by double clicking a word in the list.
Using reference files - Listing and Unraveling Data items
GAMS has a command line parameter to create reference files (aka. .ref files) called reference (short: rf). These files give information on where things are defined and used.
Why? GAMS Modelers sometimes have to deal with complex implementations that
- Use include statements to incorporate numerous files.
- Have been developed by others.
- Have a complex structure with definitions and uses of items widely spread in a file or files.
- Contain items that are defined but never used.
- Were developed some time ago but are not extensively documented.
When faced with such cases one often asks
- Are there items defined in the program that are not used and if so what are they and where are they?
- In what files is an item defined, declared and used?
To resolve these questions some years ago I wrote a Fortran program called GAMSMAP but never made it widely available. Subsequently, it was included into the GAMSIDE and then STUDIO.
When a .ref file is created for a run (using a command line entry like rf=list) and then opened by clicking on its line in the LOG file (this is located in the LOG just at the end of compile step toward the top) or simply opening it STUDIO creates a window as follows:

The column on the left (red) gives tags that can be clicked on and the key ones are
| Column | Description |
|---|---|
| All Symbols | Lists all items declared and a count of them |
| Set | Lists all sets in the program and a count |
| Variable | Lists all variables and a count |
| Parameter | Lists all parameters (items defined in scalar, parameter or table statements) and a count |
| Equation | Lists all equations in the program and the names of files in which they appear |
| Model | Lists all models that exist in the program and the names of files in which they appear |
| Unused | Lists all items that are declared or that are not used anywhere in the model |
| File used | Lists almost all files included into the model |
All Symbols Tab
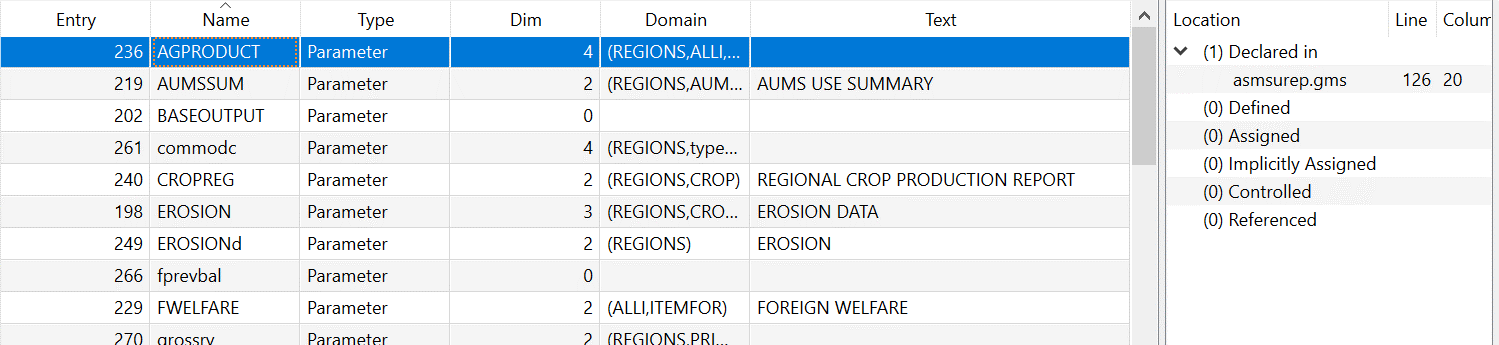
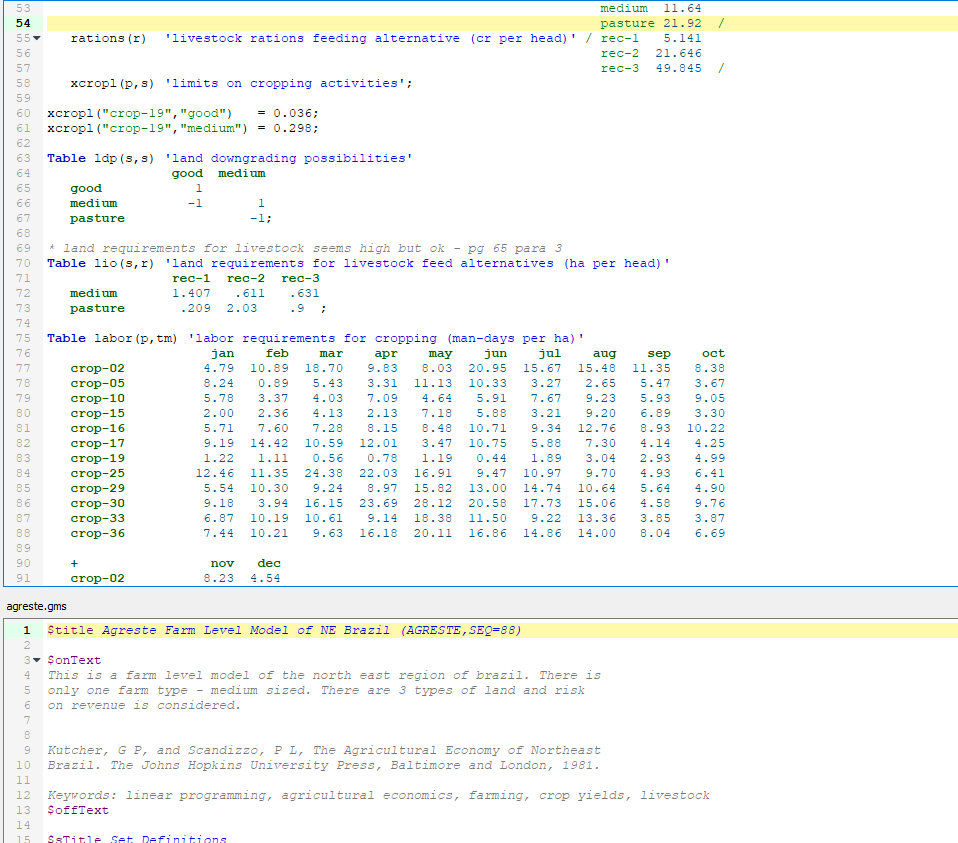
Choosing all symbols row causes the output to appear as follows (for the model library agreste.gms example):
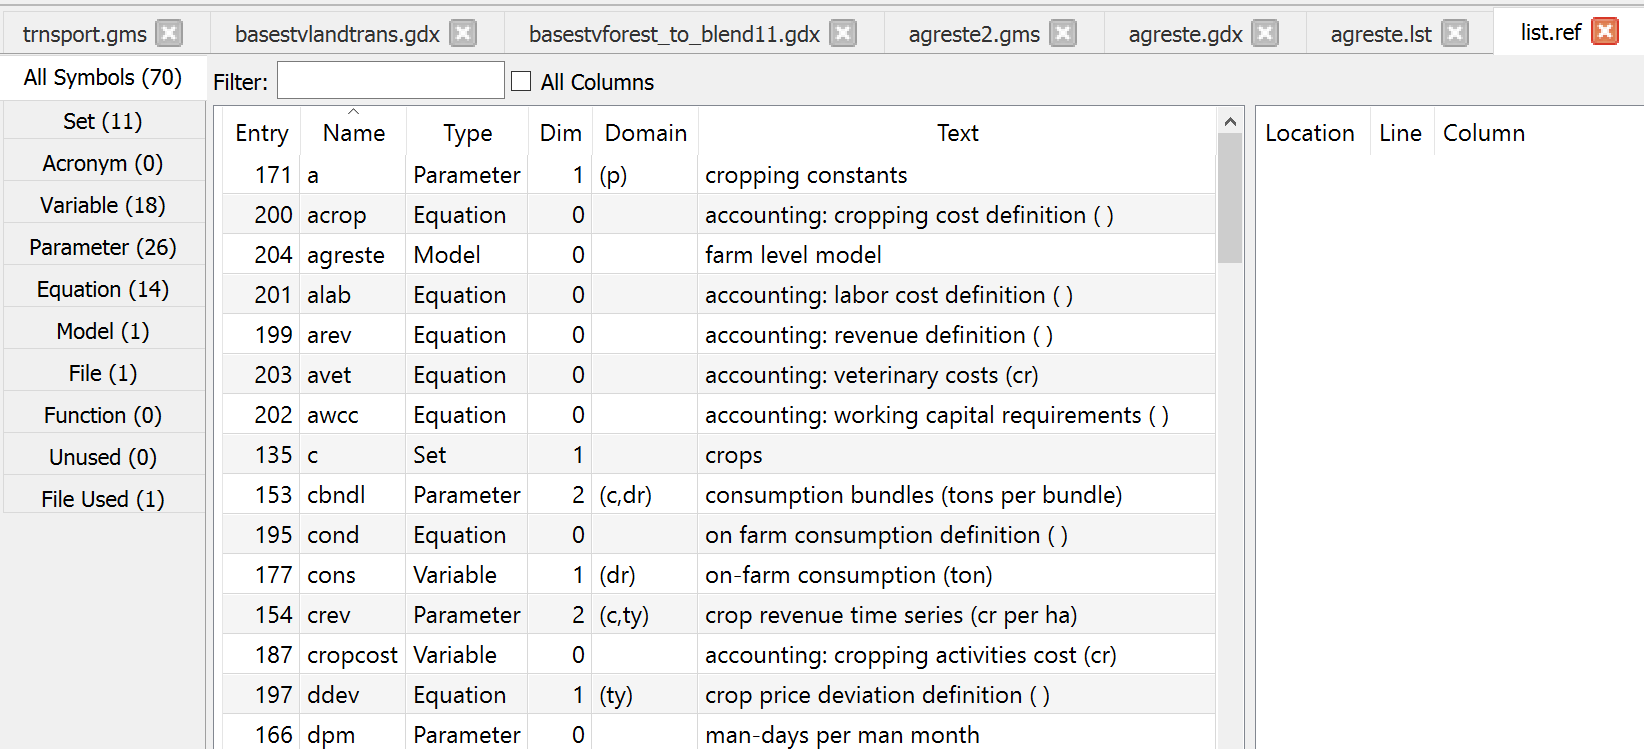
This shows all symbols used. The columns give
- the symbol name (Name),
- its type(Type) - set parameter etc,
- its dimension (Dim) - # of sets it is defined over,
- names of sets that dimension it (DOMAIN)
- the explanatory text used in its declaration (TEXT).
Things can be sorted by clicking on the column headings. One can search for symbols using the filter box.
Sets, Parameters etc. Tabs
The display contains 5 lines that when activated give information for sets, parameters etc. The resultant display lists all items falling in a class (for all things that are sets or parameters etc.) and information on their characteristics and use. Specifically one gets output as follows (for the sets in this case)
Once set is clicked on the entries tell the names of the files in which certain things happen relative to the identified items.
Clicking on a column name causes it to be sorted.
The categories include the file name, line and column where items are declared, defined and used.
| Column | Description |
|---|---|
| Declared | places where the named item is declared in a Set, Parameter, Table, Scalar, Variable, Equation, Acronym, File or Model command. This will be the first appearance. |
| Defined | places set elements or data are explicitly entered. For equations this tells where the .. specification begins. |
| Assigned | places where items appear on left hand side of an assignment statement |
| Implicitly-Assigned | places where an equation or variable has data put into it by the results of a solve statement. |
| Controlled | places where set is used in controlling a sum or defining an equation |
| Ref | places where item is on left hand side of assignment statement or in a model equation |
Clicking on lines here opens the subject file in the specific place
File used Tab
The file used tab causes the output to appear as follows:
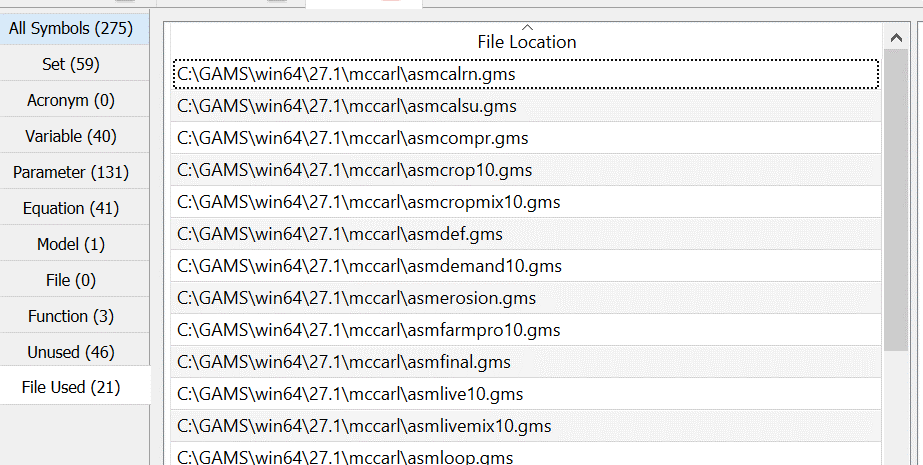
This gives the names of the files included in the program with their full path references.
Unused Tab
The unused tab identifies items that are declared (in set parameter etc. statements) but are never used on the right hand side of an assignment (=) statement or in a model equation:
which shows the same information as in the All Symbols tab except when an item is clicked on one gets information on the files where it is declared.
Steps to use the Reference File Viewer
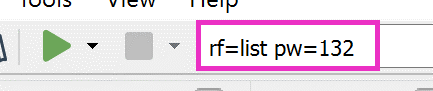
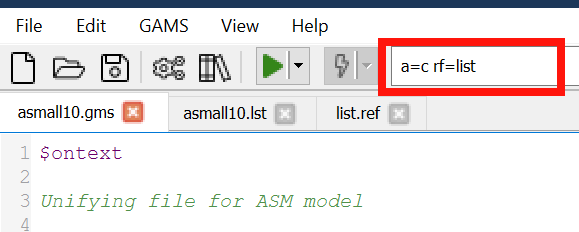
The Reference File Viewer will only work after a particular "reference file" has been created by a GAMS run. The file is generated by adding the rf option to the command line call entering a command in the command line box of Studio as follows (a=c cause compilation only):
Once the file has been run with the rf option the logfile is augmented with the (green) line identifying the .ref file name as below
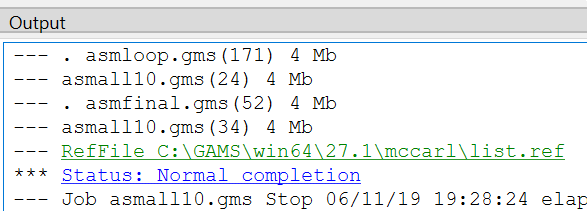
Double-clicking on this opens the Reference File Viewer window.
The run of GAMS with the rf option places the name of the .ref file in green in the GAMS log file and double-clicking on that line causes the Reference File Viewer to be opened.
Several notes about the run
- The
rf=command specifies the name of the file that STUDIO needs to open. STUDIO expects it to have the extension.ref. Typically I userf=listthat creates the filelist.ref. - The
.reffile only covers the program components in a run and does not include any information from restart files. In general to get the most complete report it is best to explicitly use all the files in one program without use of save and restart. - It is often useful to just generate the reference file without any execution on behalf of the GAMS program. This is done by including the
a=coption on the command line or in the command parameter box.
Editing Solver Option Files
Sometimes it is desirable to change solver specific options. This includes modifying things like branch and bound strategy, degree of scaling, barrier versus simplex solution approach, solution tolerances etc. The specific options allowed are described in the solver manuals.
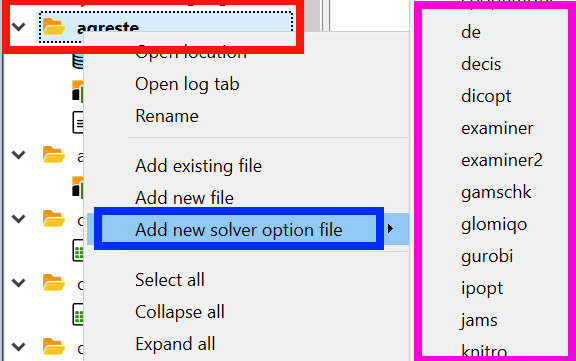
STUDIO contains a solver option file editor that presents a solver specific menu of all possible options, default values and ones that have been altered. This is activated by either
- Opening or saving a file with solvername.opt (Like MINOS.opt)
- Right-clicking on a group file name (red) in the Studio Explorer then selecting add new solver option file (blue) and subsequently selecting one of the many available solver names (magenta and only a few shown). This will create a file you then need to save.
Once it opens the general format of the solve option editor is as follows. Note the specific content depends on the solver chosen and in this case I use GAMSCHK.
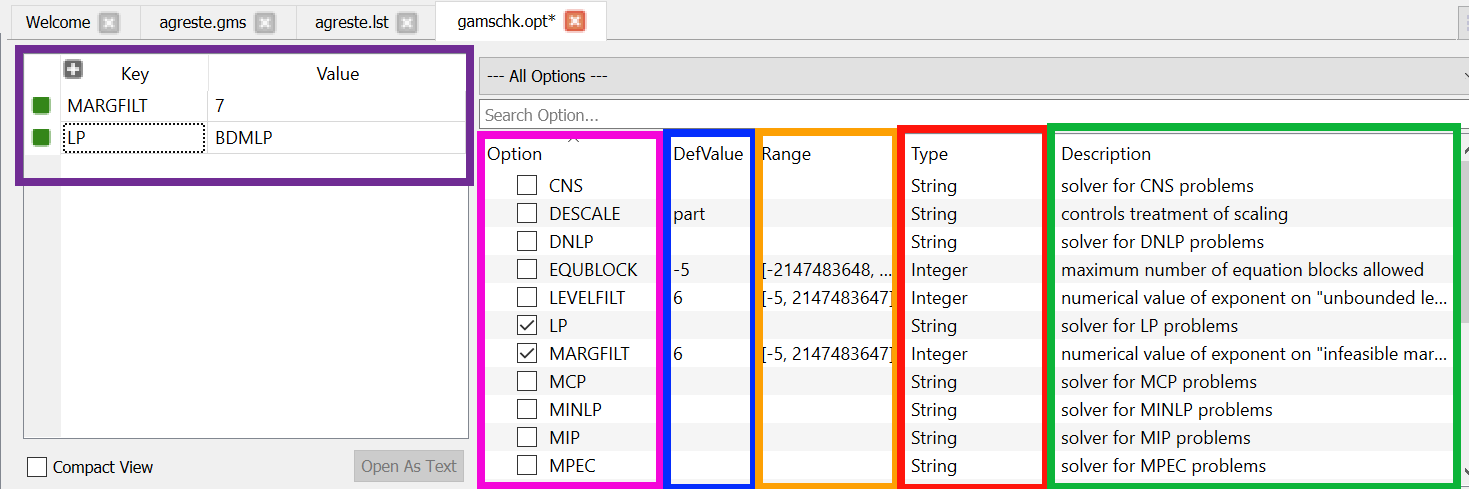
Here in the right part we see a list of all possible options (magenta) a selected class of options for this solver. A brief description of default values (blue), entry type (red), if relevant allowable settings (yellow) and a one sentence description of the option (green). In the left part we see the current entries (purple) in the option file and their settings (purple).
Subsequently, when this file is opened or its tab activated then this solver option editor appears.
Note, pressing F1 while on an option opens help to a place with a detailed description of that option.
Splitting the Screen
Sometimes you want to look at two parts of a file or two files.
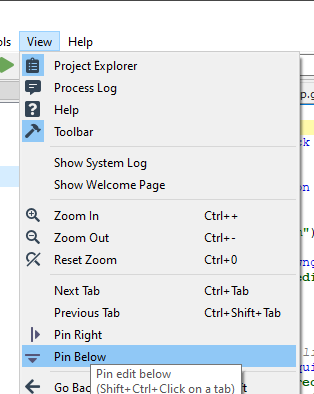
If you open a file and then click view and pin below, you get a window looking like that with two segments of the same file and you could further activate then open an alternative file and look at two different ones simultaneously.
Using the Debugger
A quite new feature of STUDIO is the debugger. With the debugger one can specify a line to run to in the code then run up to that point and suspend execution and get a program generated GDX file of all the data items as of the start of that statement. One can then examine all the data and either
fix some things and start over
or
resume execution to the next break point and get another GDX file then do examination.
Now lets see how to do this:
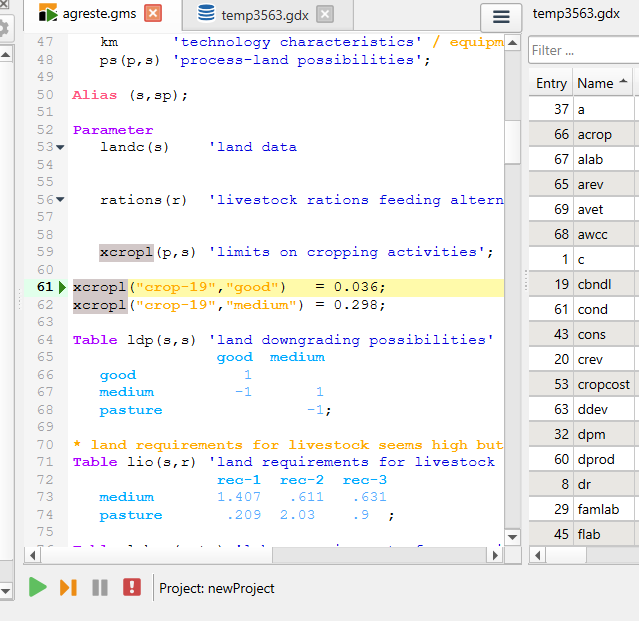
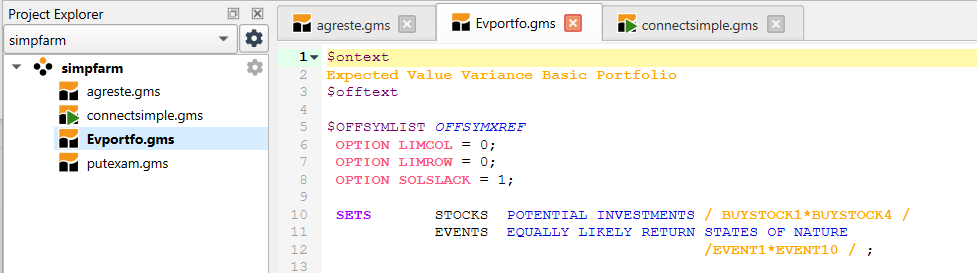
Suppose we take the model agreste.gms from the GAMS model library and assign a breakpoint at line 184. We do this by going to a line number in the code and right clicking then choosing add breakpoint as follows:

Subsequently Studio will highlight that line number:

Additional breakpoints can be added.
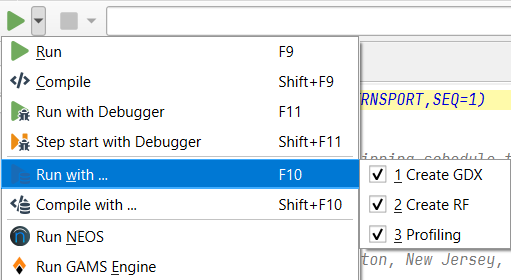
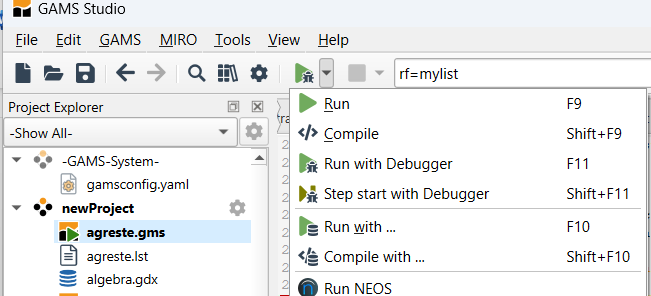
Then to run and get the GDX file one initiates a run with the Run with Debugger or F11 choice:
When I do that it runs to the first executable statement in this case line 61 (not a breakpoint I assigned) and stops then you can press the green resume button:
Then it will run to your first breakpoint.
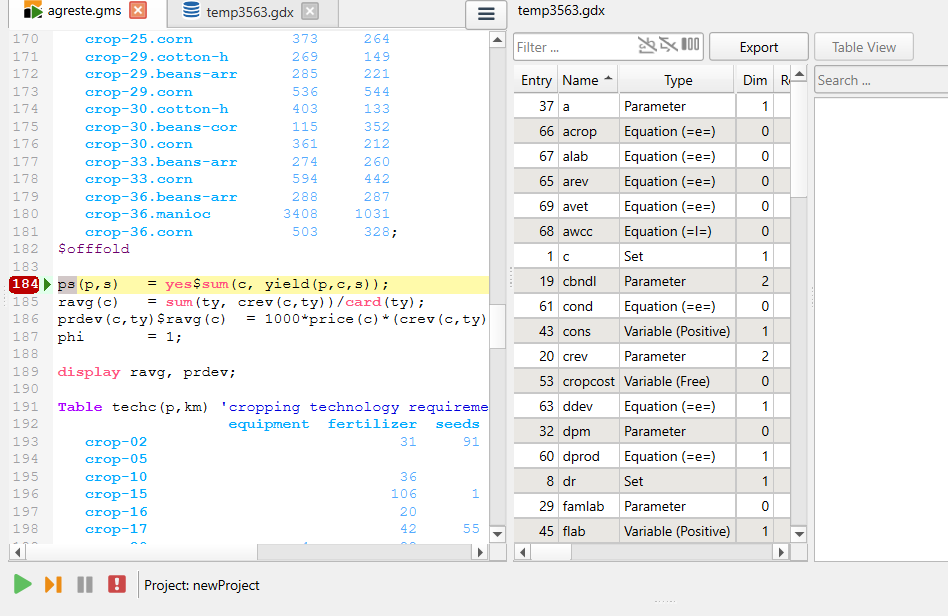
When it gets to your first breakpoint you get a screen like that below. Therein you see the breakpoint (here line 184) and a GDX file that contains values for all data in GAMS as resident in the program just before the breakpoint statement is executed. You then can explore those data using the GDX file editor features of Studio.
You can then either resume execution moving to next breakpoint (you could add a new one as well), resume execution moving one executable line forward, or stop the process using the buttons at the bottom.

Working with Multiple Projects
Sometimes when running Studio I am working on more than one project at a time and the files are intermingled. Studio does have two ways to unravel these files plus one way I use to restrict attention to only relevant files. Consider the following screenshot wherein we have two projects - newproject and simpfarm:
Therein the active tabs involve multiple files from each project with no real identification of what is from where. In addition the file agreste.gms is active and is present in both projects. In this case both projects use that file from a common location but this could be pointing to two identically named files in two different places. This potential overlap and file convolution can be confusing.
There are a few ways that help with this using buttons that are available in Studio.
In particular in the upper left of the window there is a drop down arrow.
If one clicks on it then it drops down a list of the current active projects and one can choose to either have all displayed or choose a particular one.
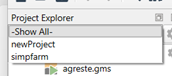
Given we choose one then the display in the explorer and in the active tabs is restricted to just files from that project.
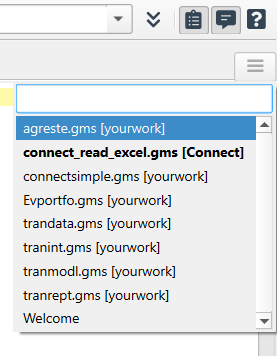
One can also navigate between files and identify where they are located via two Studio window features. First one can click on the three horizontal bars in the upper right of the window.

When that is done one gets a drop down menu of all files in open projects with the name of the subdirectory where they are stored in brackets plus a bolded line for the most recently opened or edited file.
One can also use the navigation button at the bottom as covered below.
Second one can navigate files and identify their location via the "Navigator" box in the Studio window.
When one clicks that window (or uses Ctrl + k) a file list pops up that contains a list of all files in all projects within the explorer. This contains information on where the file is located when that differs from location of the current active file. It also has an indicator on the far right that is inconsistent and I do not see it as useful.
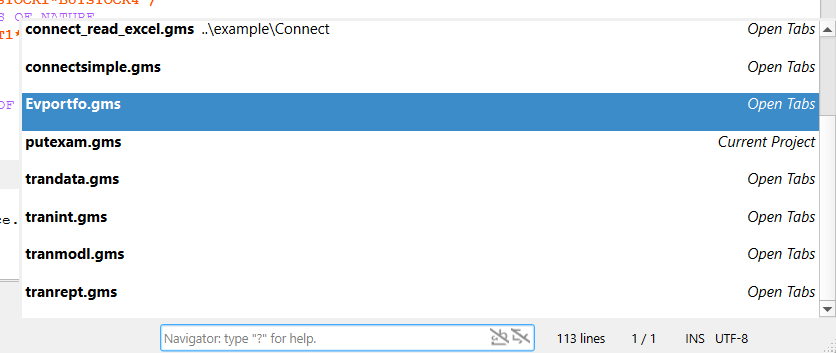
The navigator window does allow use of a file mask (e.g. c*.gms) to restrict list contents. That window has a rather confusing array of other capabilities I have not used as covered in the Studio documentation or called up by entering a "`?`".
There are a couple of other Studio features that involve multiple projects.
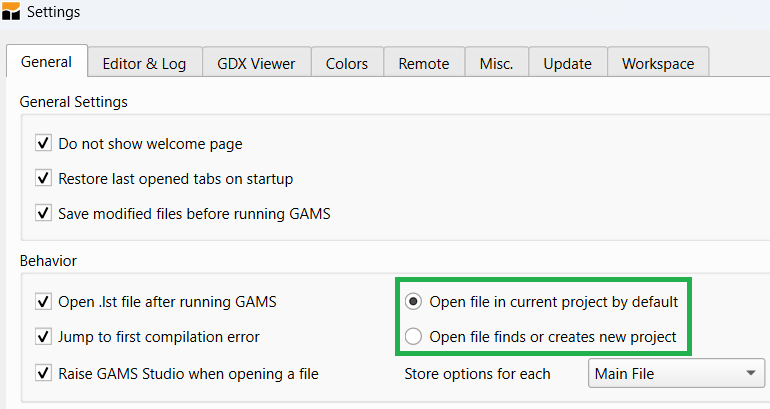
First in the Studio setup dialogue there are choices relative to how Studio places newly opened files into projects.
In particular under File and Setting in the General Tab one finds a choice of whether to put files in the current active project or start a new one. I found working with the new project choice was quite unsatisfactory and I got an unwieldy assortment of projects.
So I strongly recommend choosing the top one.
Removing Files
I also find that I often end up with files in a project which do not really belong there but end up there due to the open in active project choice.
Thus I periodically clean a project removing excess files. This is a two stage process.
First under the GAMS menu of Studio click on the Clean All Workspaces line and the following dialogue will show up.
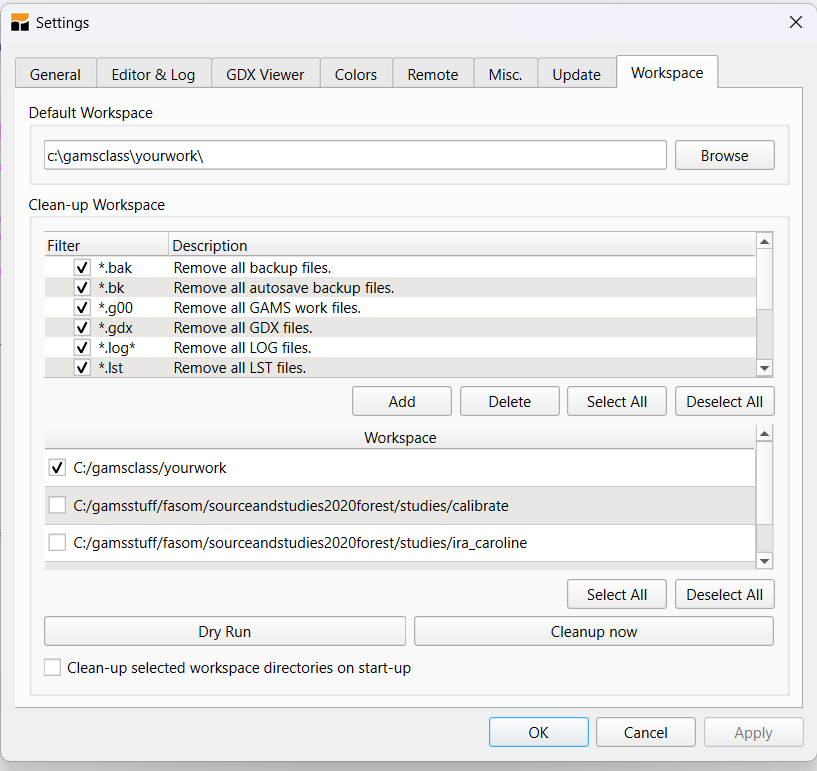
There you identify types of files to delete and directories to clean (be careful with your selections as you may want to retain LST, LXI, REF and GDX files plus may only want to clean selected places). Once these selections are made then pressing the Cleanup now button removes thse files from the project directory and the Explorer.
In the second stage we use the Explorer to remove file associations. There we select files with the mouse then right click to obtain the drop down menu below and choose remove from project or if the file is no longer wanted Delete File:
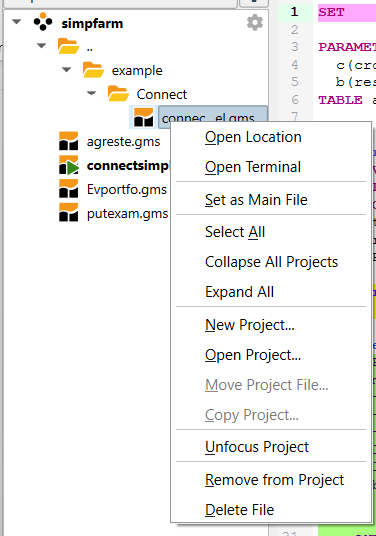
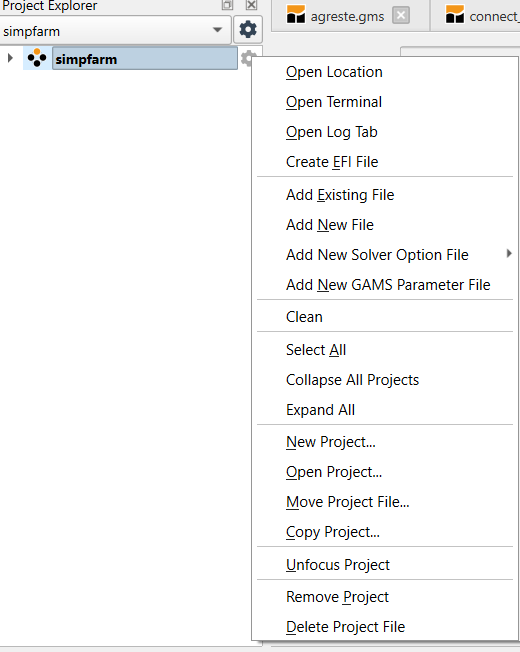
One can also remove a project from the ones listed within the Explorer by clicking on the gear image for that project then selecting Remove Project or Delete Project File if it is no longer wanted.
Multiple main files
The final project related topic here involves the use of multiple main files and Studios storage of any GAMS parameters.
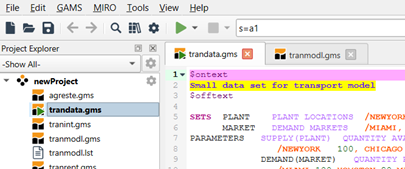
I almost always have multiple step jobs linked using save and restart files. When I first started using Studio some suggested using a different project for each step. But this proved unwieldy with way too many projects and excessively complex procedures needed to move between modeling efforts. I then vowed to have a single project per modeling effort. This involved defining multiple main files within each project. Today Studio stores GAMS parameters for each main file.
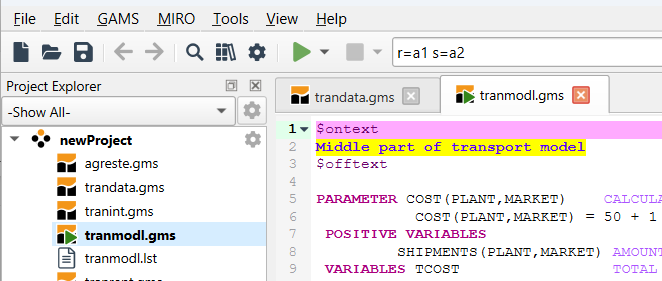
Below the first screenshot shows step 1 where the data compilation step (trandata.gms) is marked as the main file. The next shot shows when the model definition step is the main file (tranmodel.gms). Note in those two cases that the save restart information in the parameter box differs.
In this case when I switch the main file the GAMS parameter box information is remembered and sticks with the designated main file. It is also retained when Studio is closed down and restarted.
When is it Not Worth Using?
There are costs and benefits of these approaches.
The STUDIO is much easier for simple models and can run across platforms.
The Windows/command line approach is generally better for models in customized environments.
A development strategy for more complex implementations
- Use the STUDIO to get it right
- Debug components of large models using save and restart
- Then use script files or Windows/UNIX with batch files such as
GAMS mymodel -lo 0 -s ./t/save1
call myprogram.exe
GAMS moremod -lo 0 -r ./t/save1
What does it not do?
Some IDE features are currently missing. Just to inventory (note the last couple are pretty unimportant to me.)
- Ability to change the file associations it recognizes when clicking on them in Windows Explorer (you get more than I like at the moment and sometimes I want more)
- Text file differencing (can use other programs)
- Spell checking
What does it not do so well?
Here are also some difficulties with it as of today
- Washed out colors - on my machine the syntax and error coloring is not very prominent.
- Unusual bolding and choice of items to color in the syntax coloring .
- Excessive library choices and no way to put the ones you have no interest in somewhere out of the way. Note though as of a recent version the user defined library appears first at my request.
1) Specialist in Applied Optimization, Distinguished Professor of Agricultural Economics, Texas A&M University, Principal, McCarl and Associates, mccarl[at]tamu.edu, brucemccarl[at]gmail.com, https://agecoresearch.tamu.edu/mccarl/